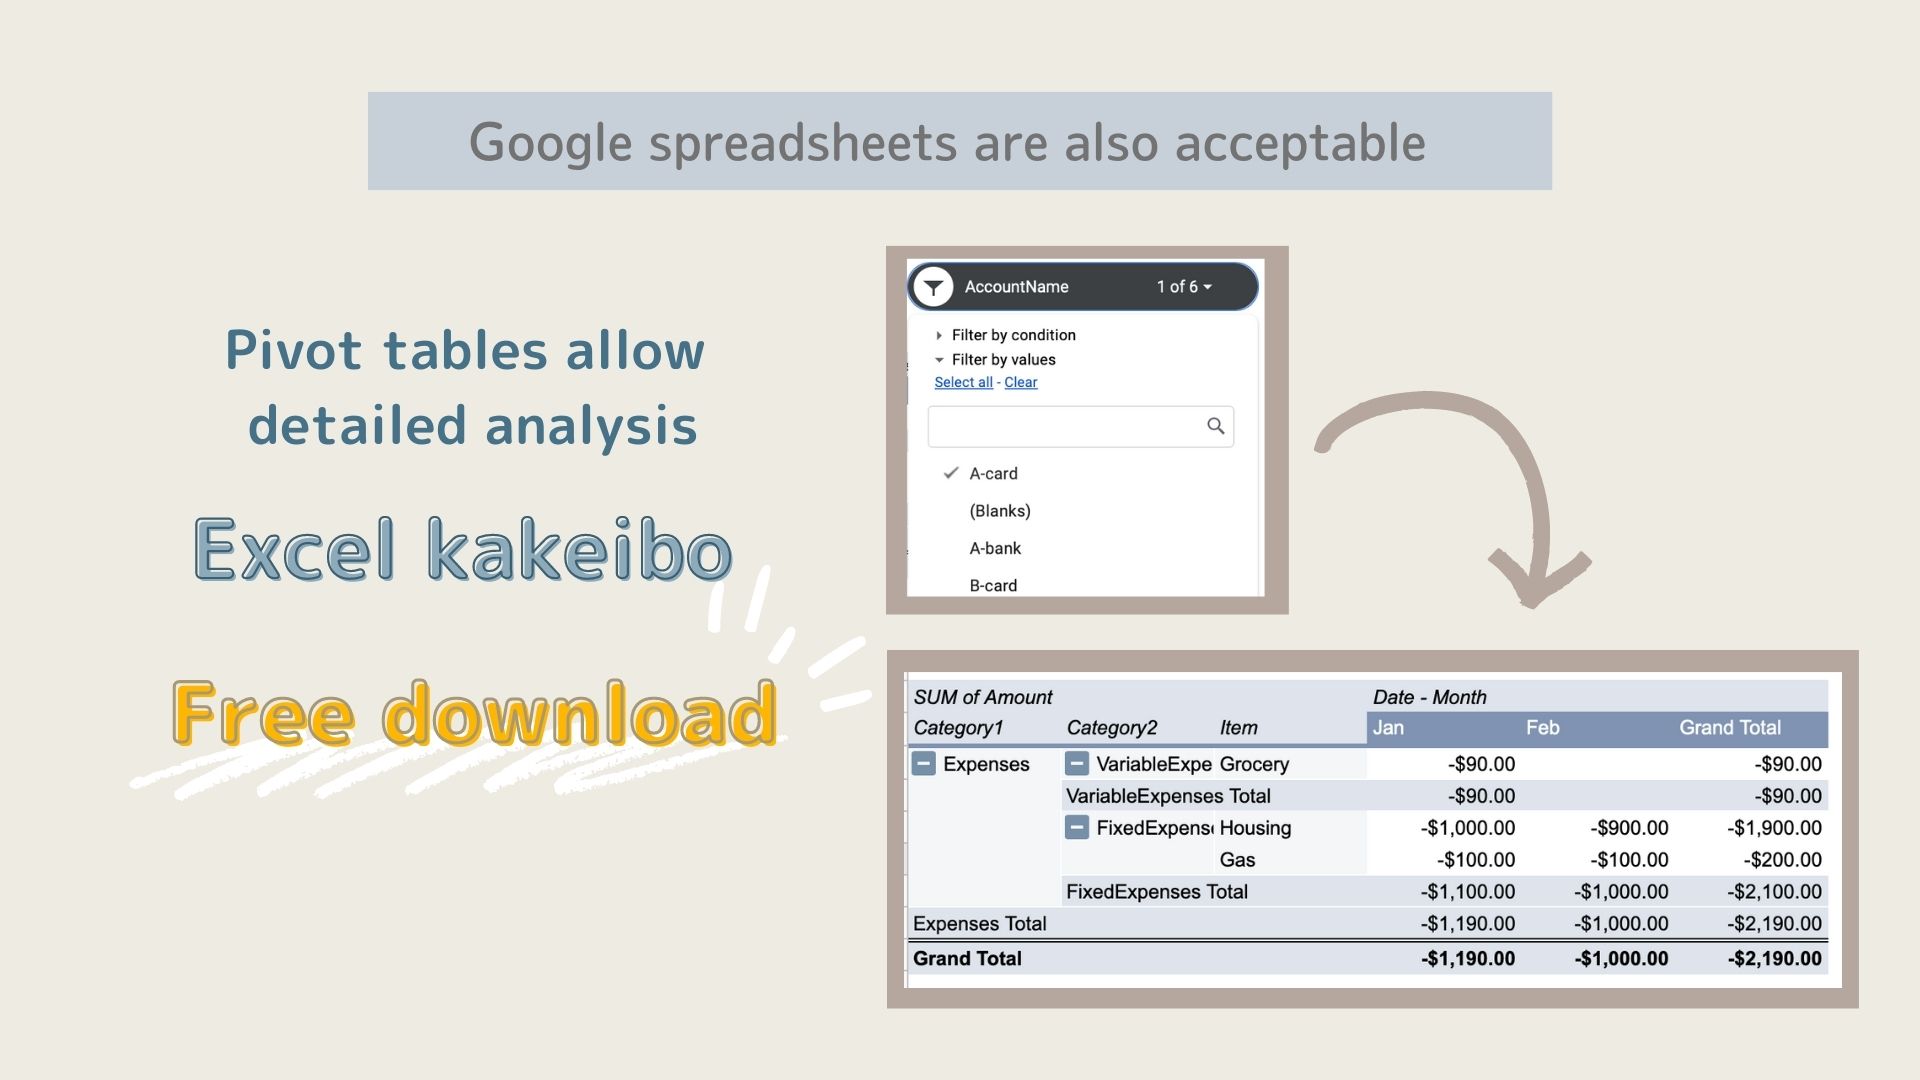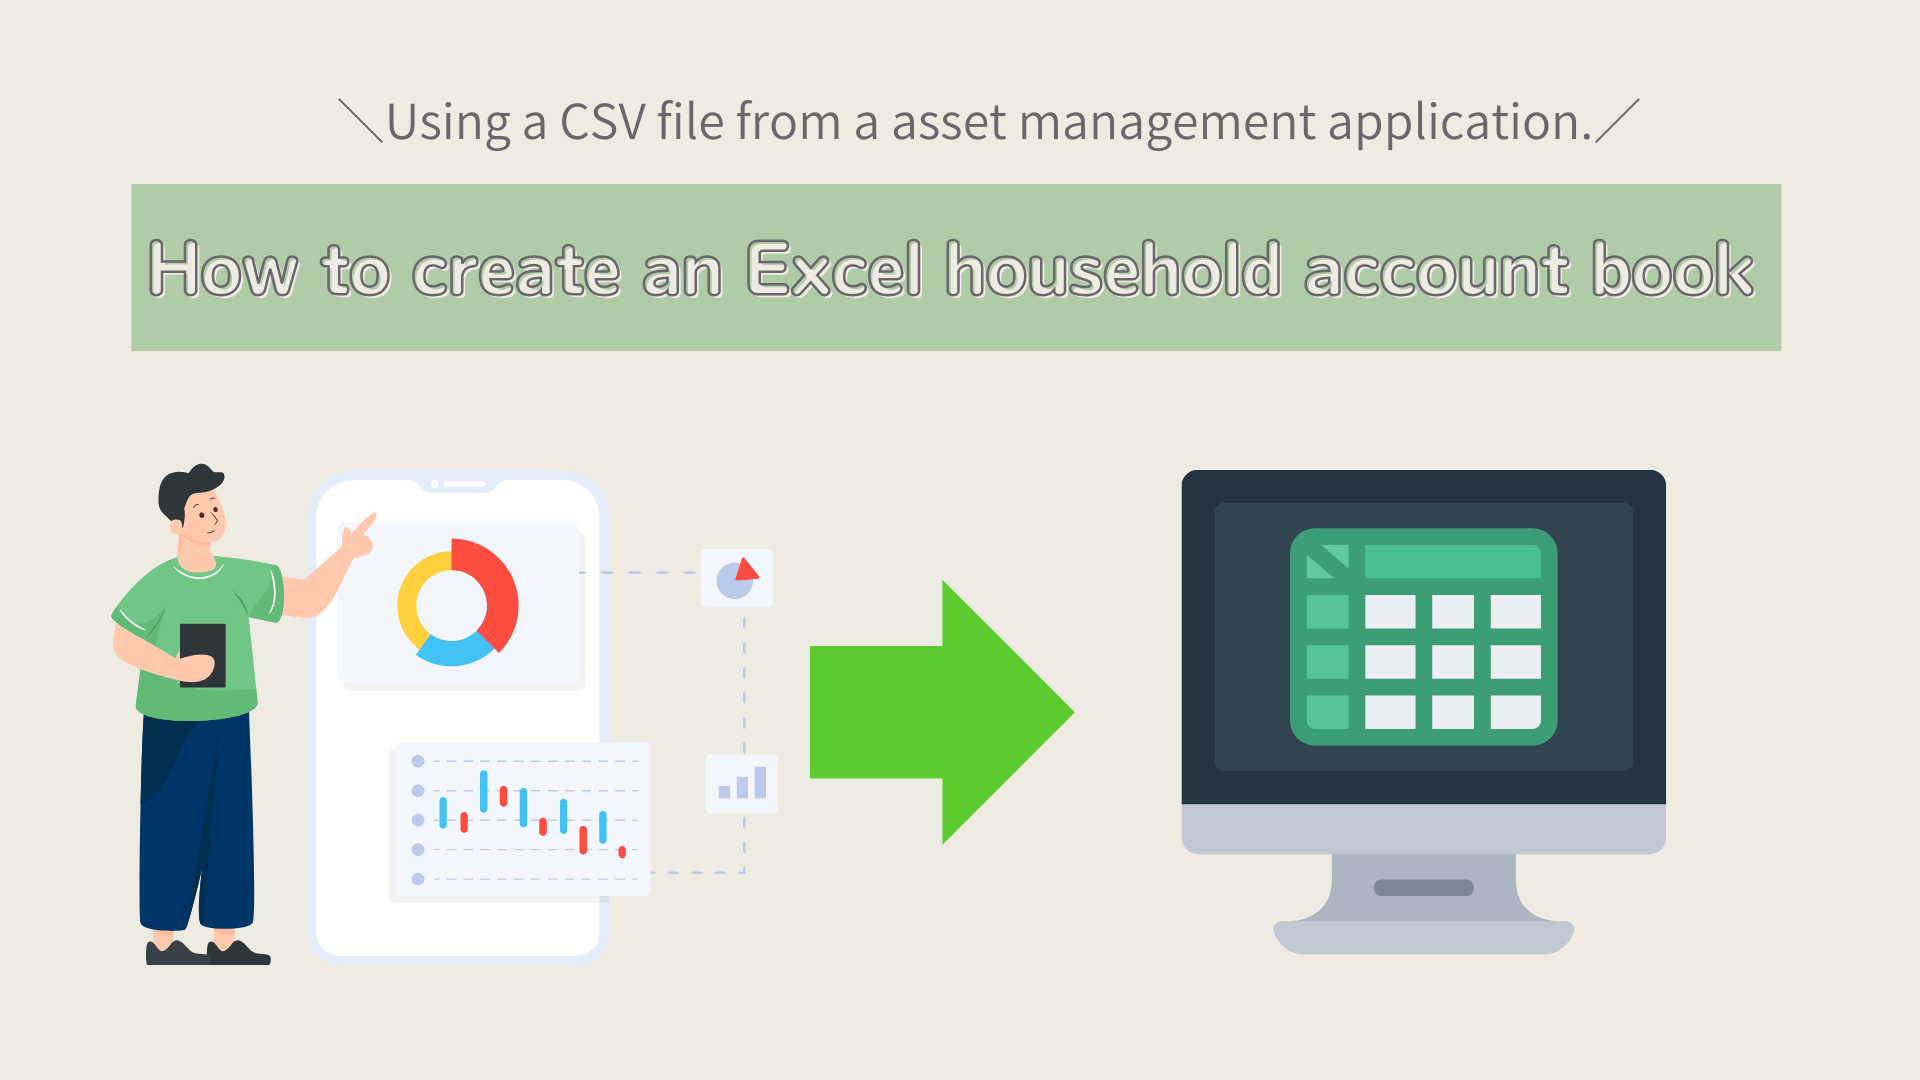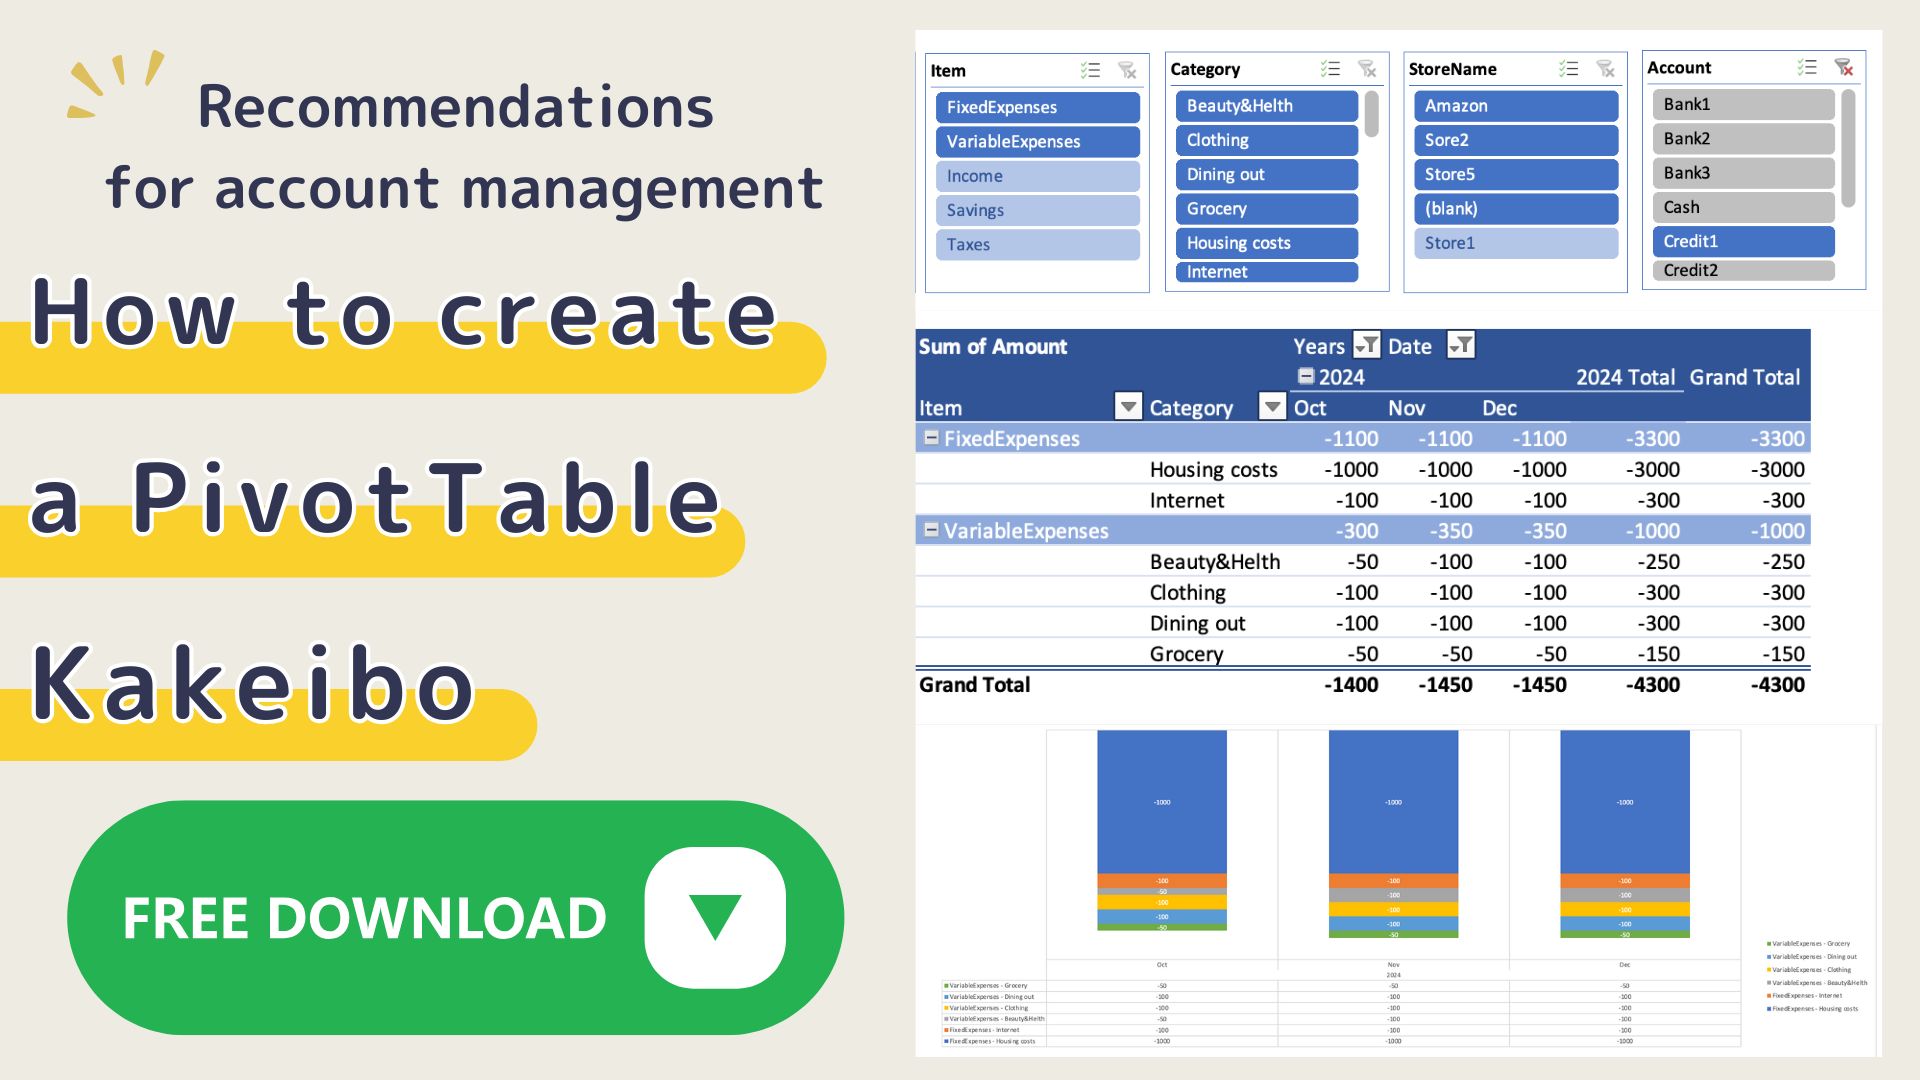
This Kakeibo uses pivot tables that can aggregate and analyze large amounts of data.
It is recommended for those who want to analyze data thoroughly, as it allows analysis from various perspectives, such as by expense item, by account, or by store.
Recommended type
- People who want to manage their accounts.
- People who want to know the monthly consumption amount by store.
- People who want to manage their consumption by product or by specific item name.
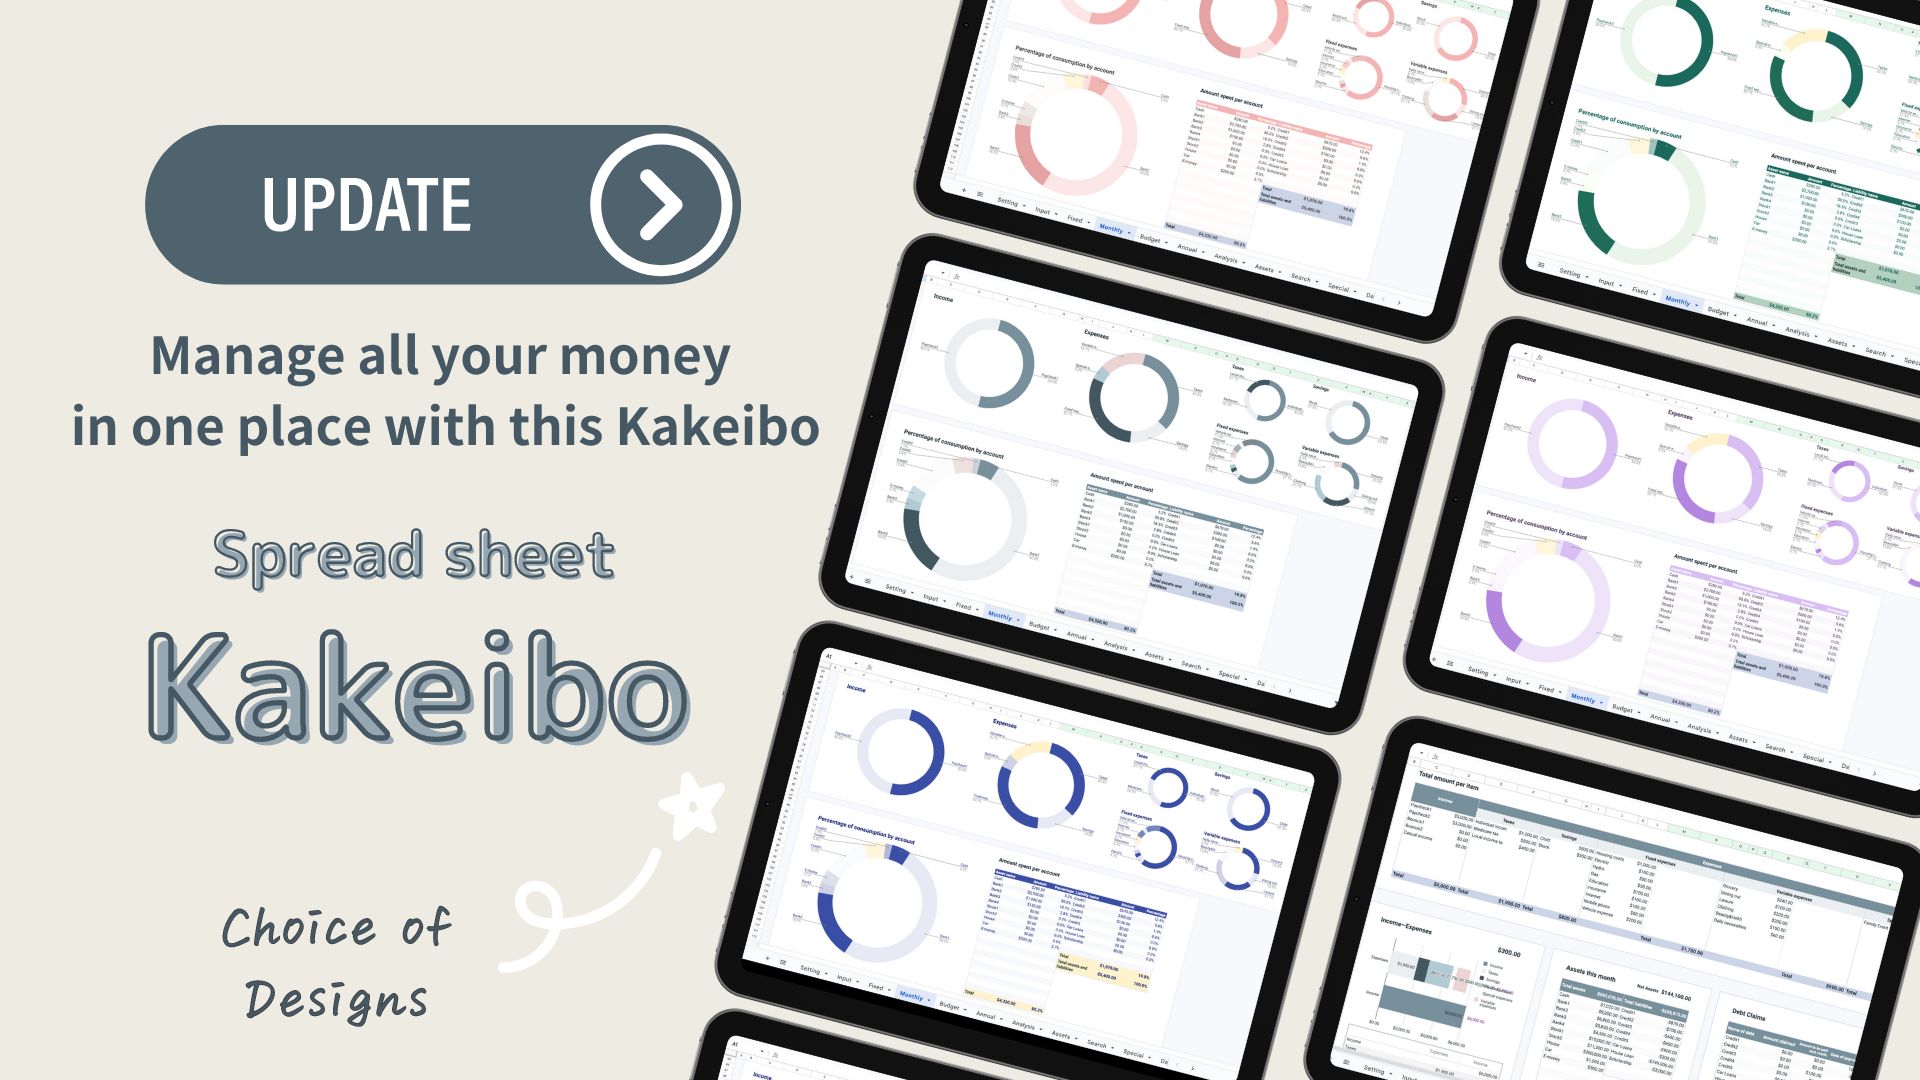
Features of a Kakeibo
- Enter expense, account, and store names on the Setup sheet
- Record daily household accounts on the Input sheet
- Compare monthly household accounts on the Table sheet and the Graph sheet
- Pick up only the information you want to know by expense, account, store, etc.
Setup sheet
Input sheet
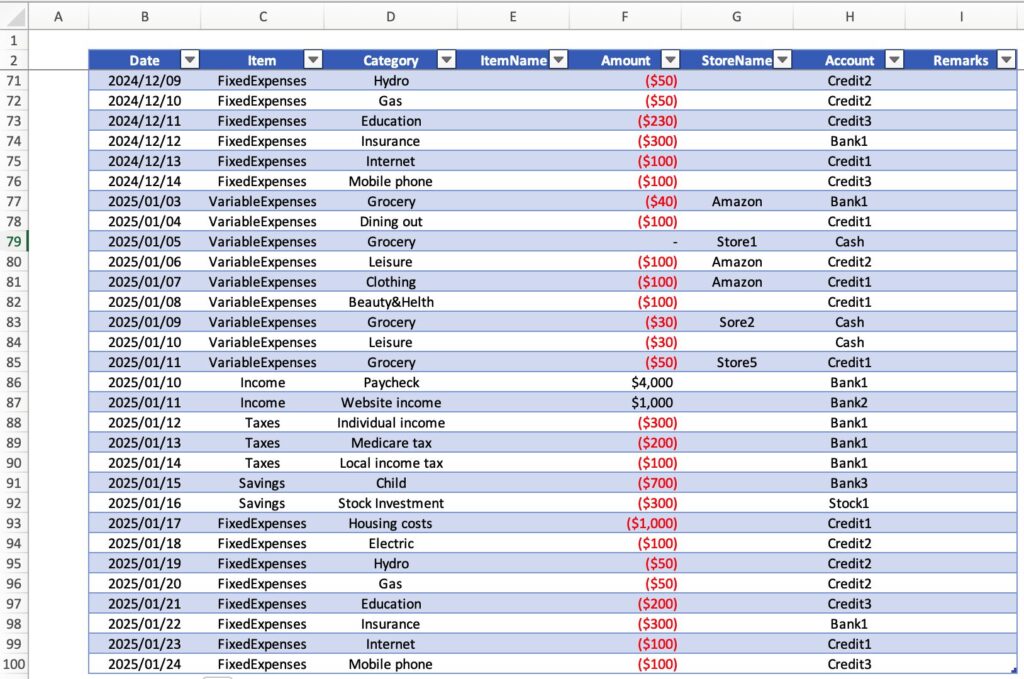
Table sheet
Graph sheet
Specific time period Show only items
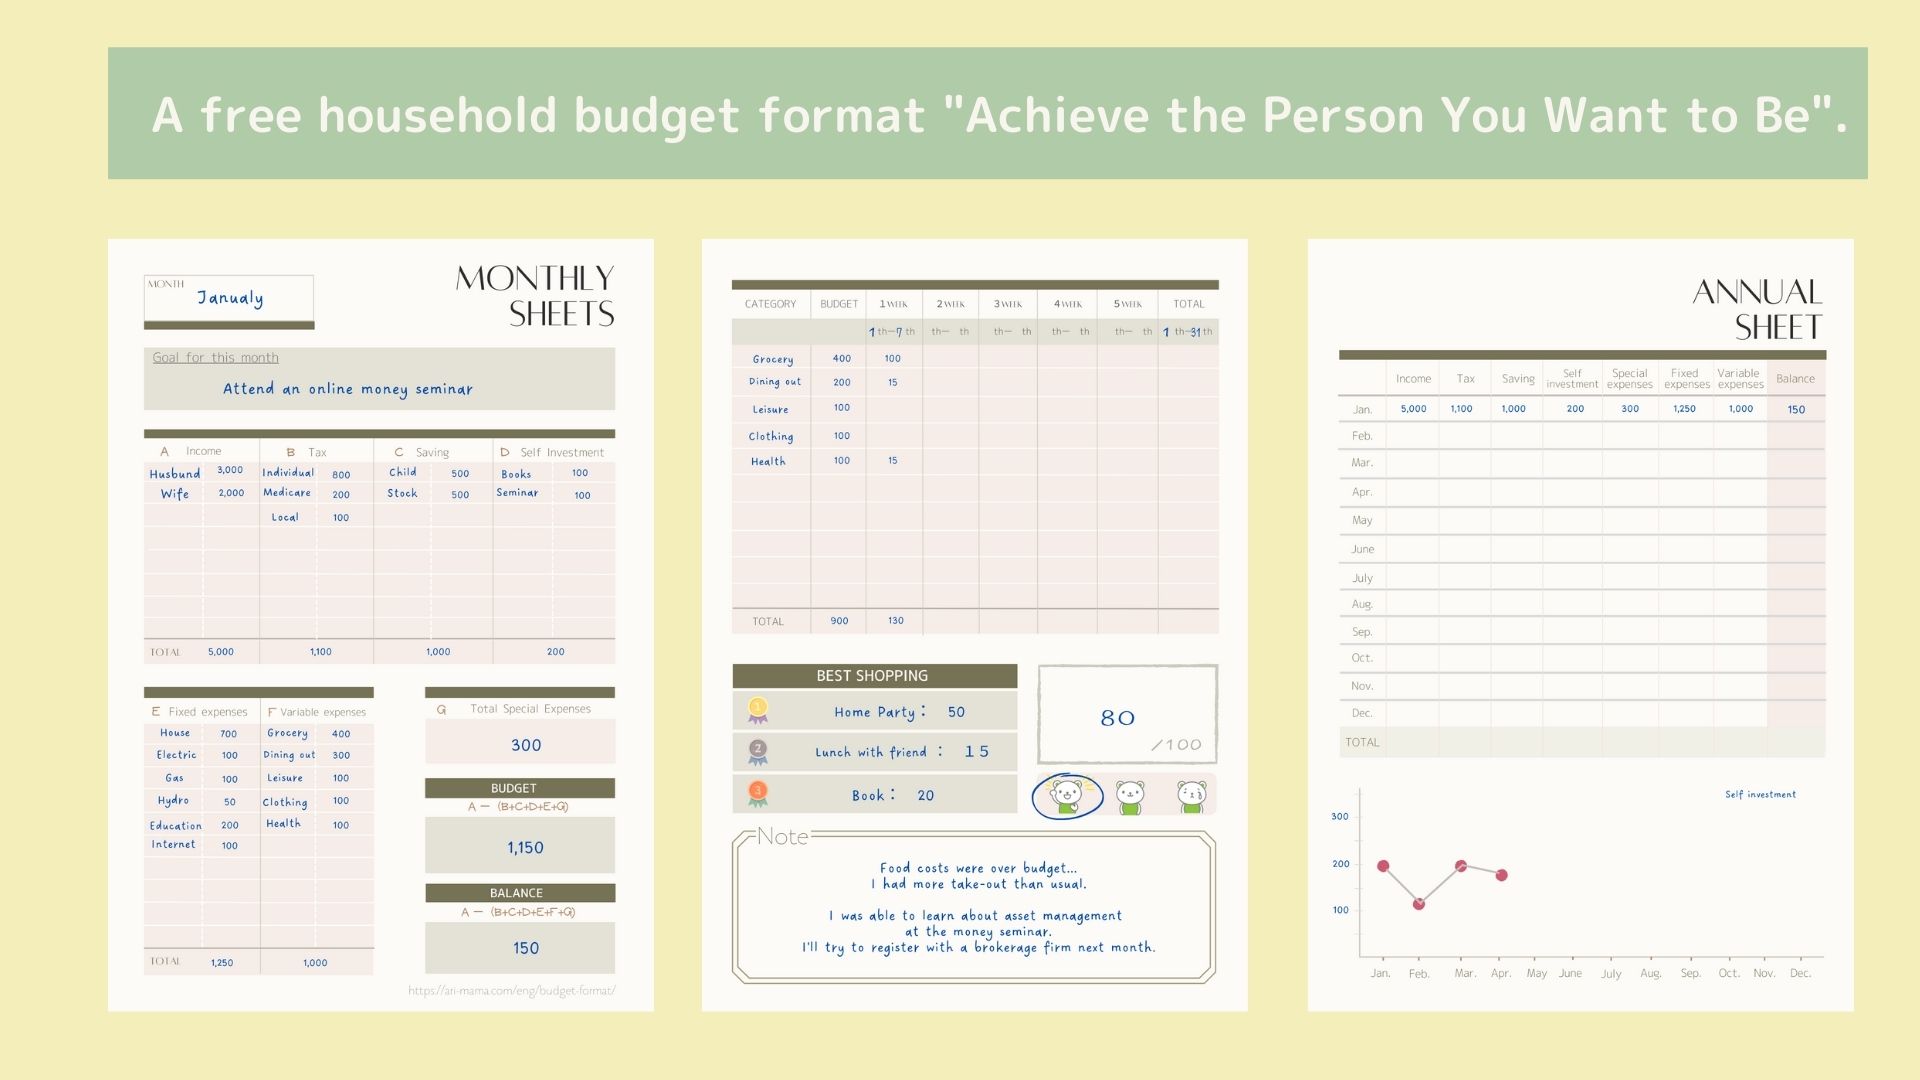
How to create a Kakeibo
Setup Sheet
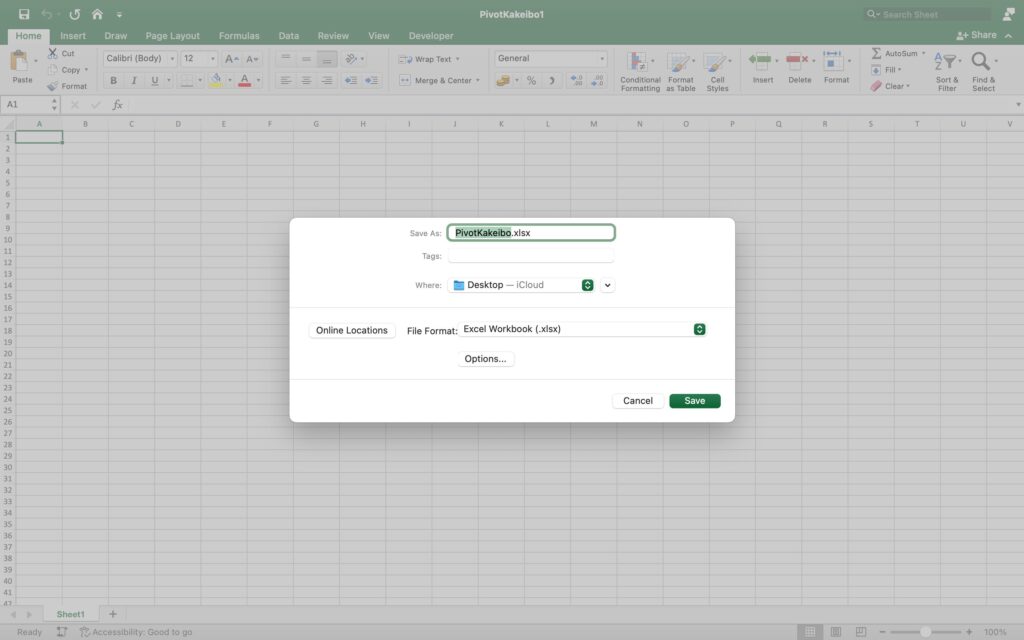
Naming the file
Open and name a new Excel file.
Select “Excel Book (.xlsx)” as the file type.
What to do first
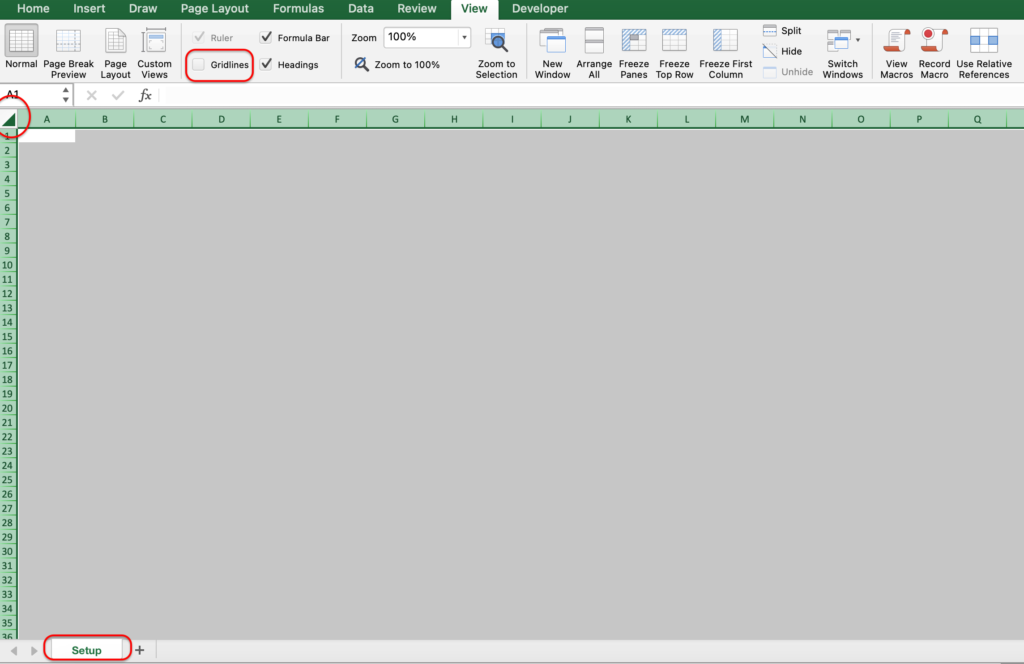
- Change the sheet name to “Settings” in the lower left corner.
- Remove the grid lines.
Select the entire sheet by clicking on the triangle in the upper left corner.
Uncheck the Gridlines.
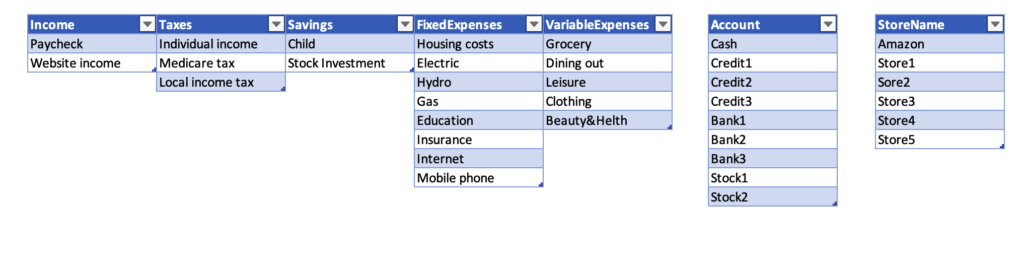
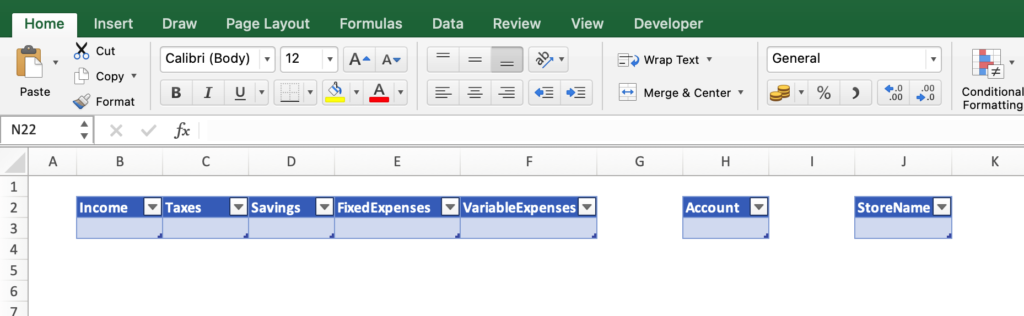
Setting Up Item
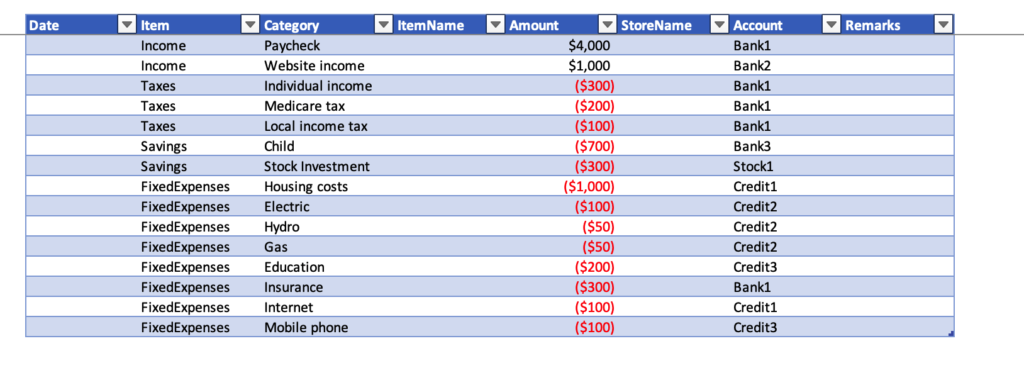
- Income
- Taxes
- Savings
- Fixed Expenses
- Variable expenses
- Account
- Store Name
Enter the name of the income and expense item, store name, and account on the second line.

Setting up the framework
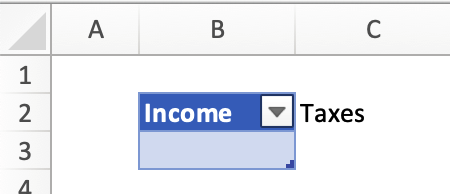
Select cell B2 and choose Insert, Table.
The range is B2, check “My table has headers”.
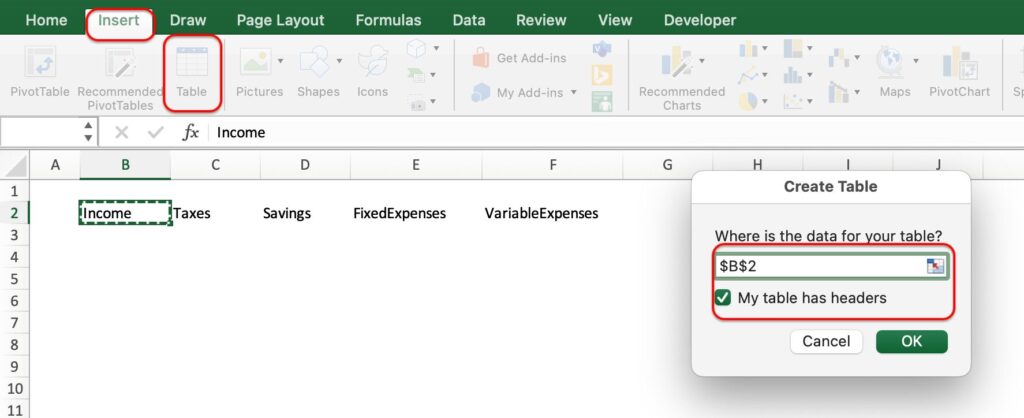
It is automatically framed and colored.
Set other items in the same way.
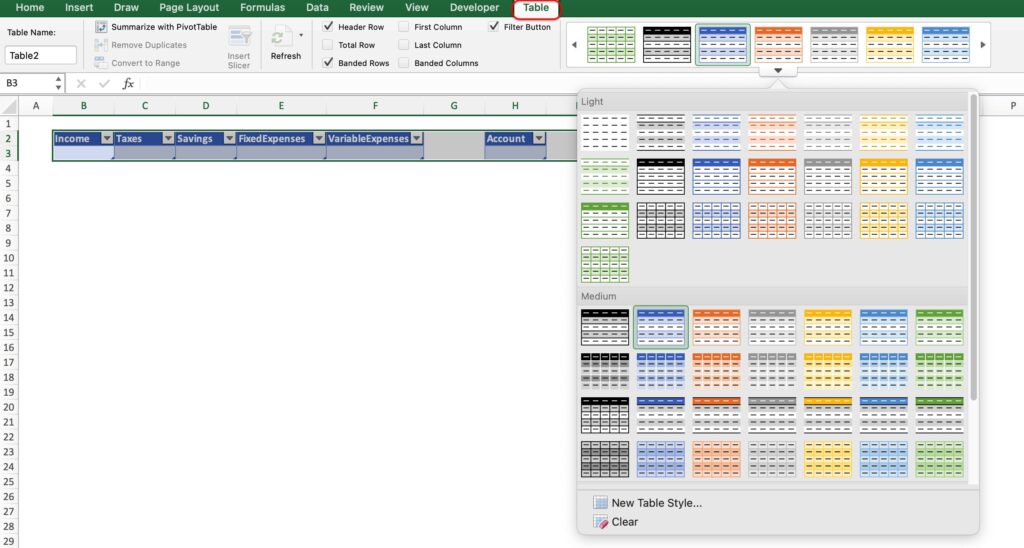
Set up the design
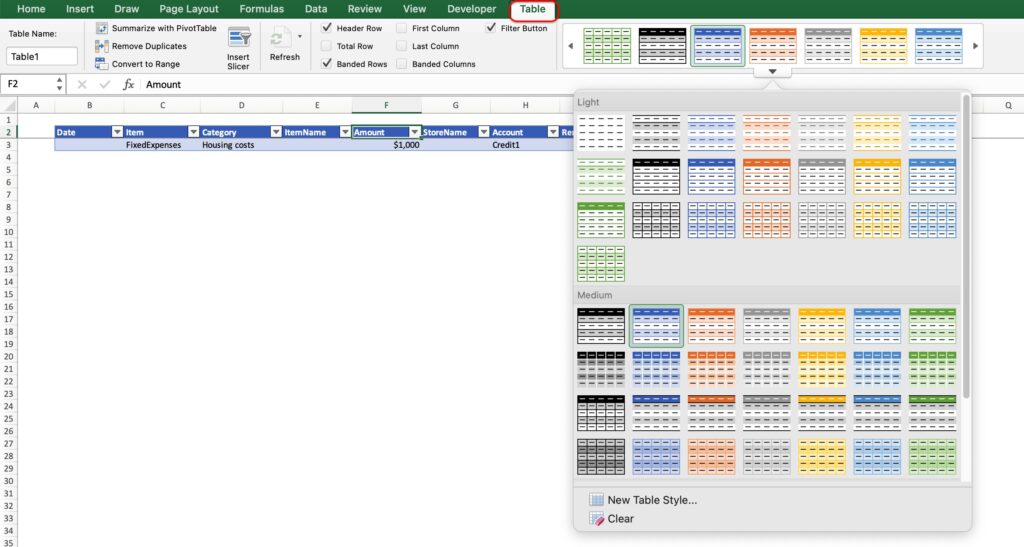
Select the table and click on “Table” at the top.
Select a design.
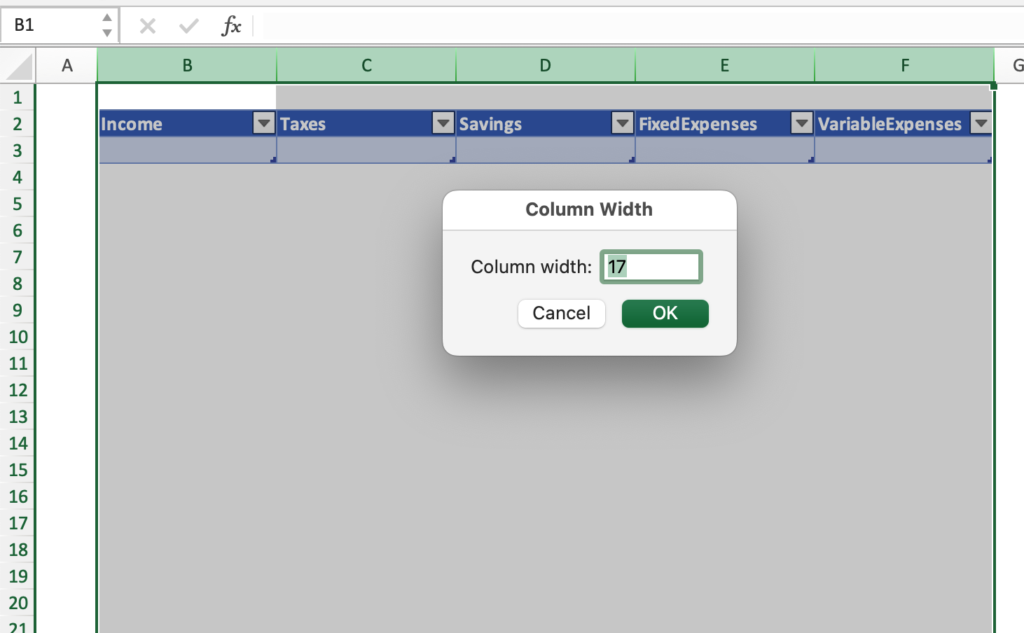
Increase the width of a column.
Select a column, right-click, and choose “Column Width".
Enter a numerical value.
Entering sample names
Enter a sample name.
A frame is automatically added each time you enter a name.
There is no limit to the number of frames.
What to do if a frame is not added automatically
In Microsoft
Options > Text Editing > AutoCorrect Options > Input AutoFormat
Check Include new rows and columns in table
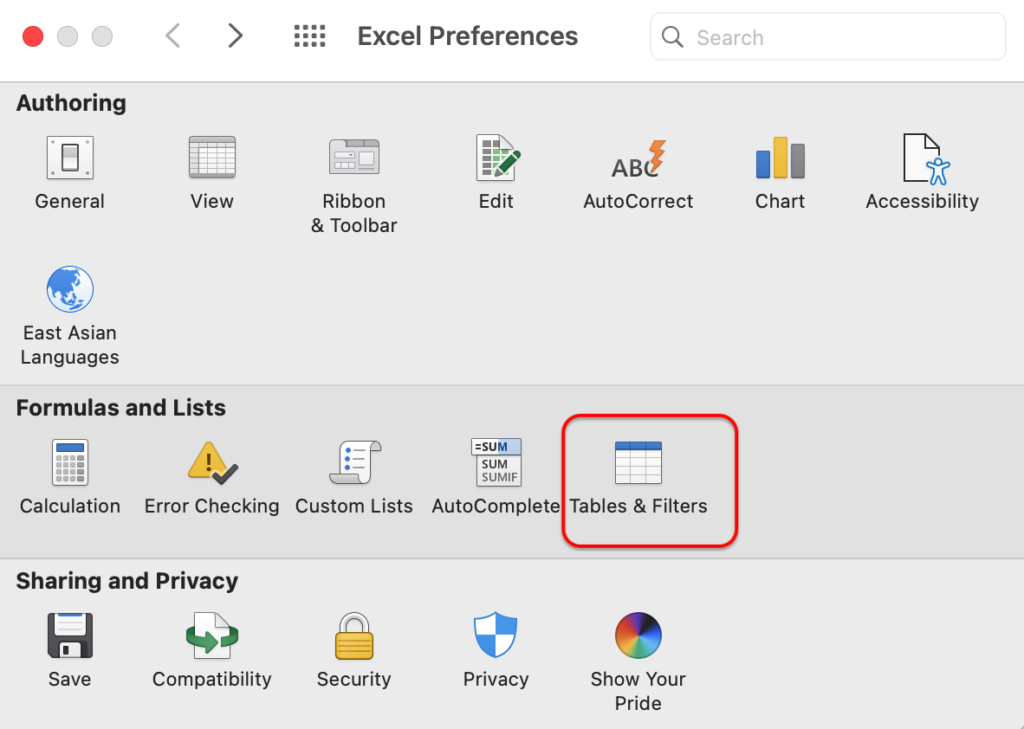
On a Mac
Preferences > Tables and Filters > Check “Automatically expand tables

Give a name
Name all expenses as “Income” for income expense names, “Tax” for tax expense names, and so on.
Named items are used in the expense setup on the input sheet.
Target Item
- Income
- Taxes
- Savings
- Fixed Expenses
- Variable expenses
- Account
- Store Name
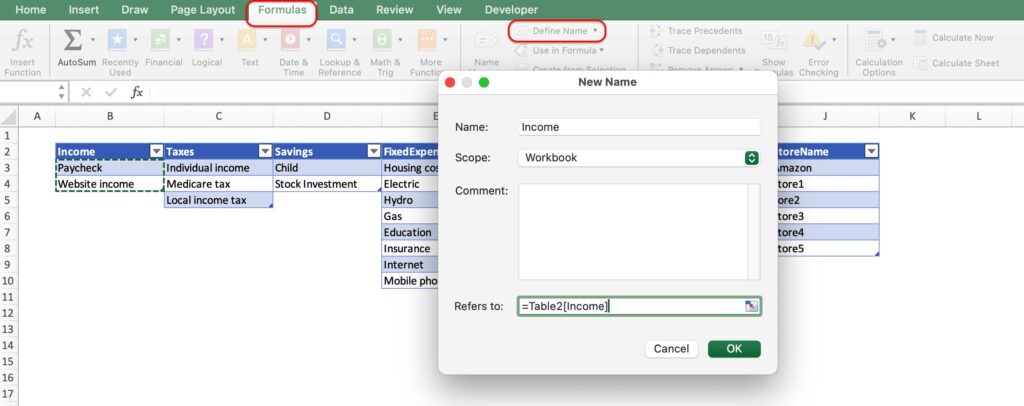
Click on the formula and "Define Name".
For the name, enter “Income”.
To see next, select a range of income names.
Name must match the name on the second line.
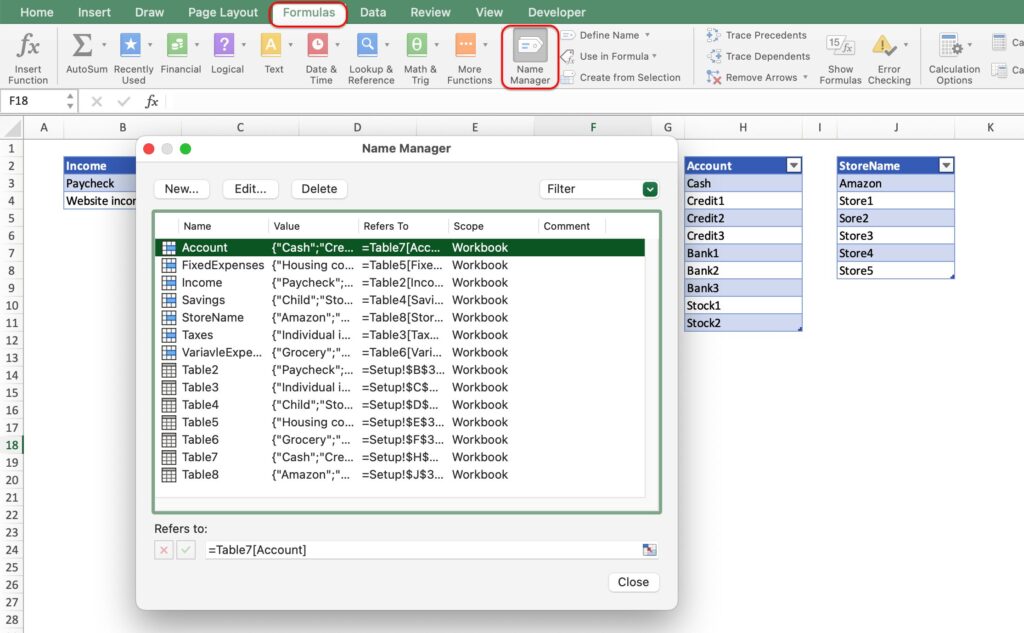
To see the named range, click on “Name Manager” in the formula.
The range is automatically extended when you add an expense item name.
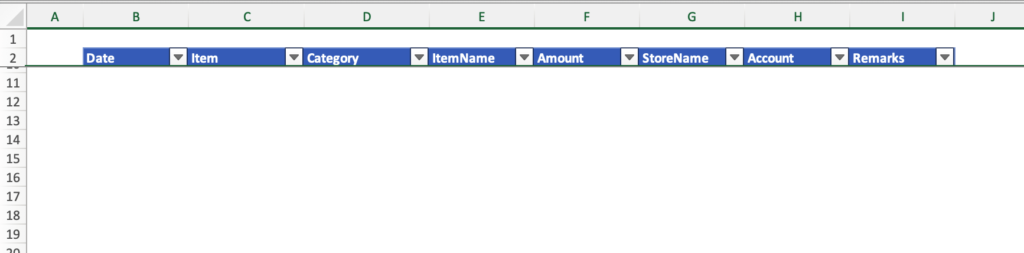
Input sheet
Refer to “What to do first” on the setup sheet to enter the sheet name and remove the grid lines.
Create Heading Row
Create a heading on the second line.
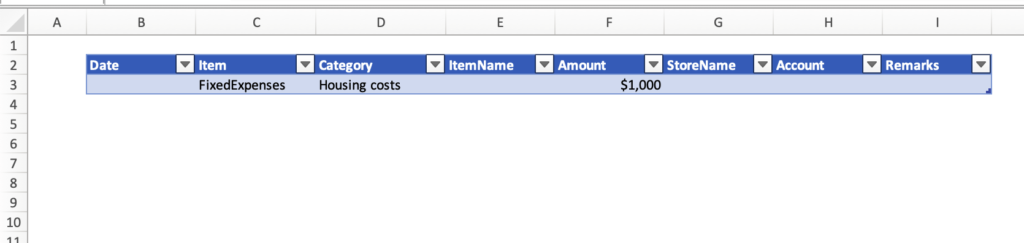
- Date: Enter the date
- Items: select from Income, Taxes, Savings, Fixed Expenses, and Variable Expenses
- Category: Display the expense name for each item
- Item name: Enter manually
- Amount: Enter manually
- Store name: display the name of the store you set up
- Account: Display the name of the account you set up
- Remarks: Manually input

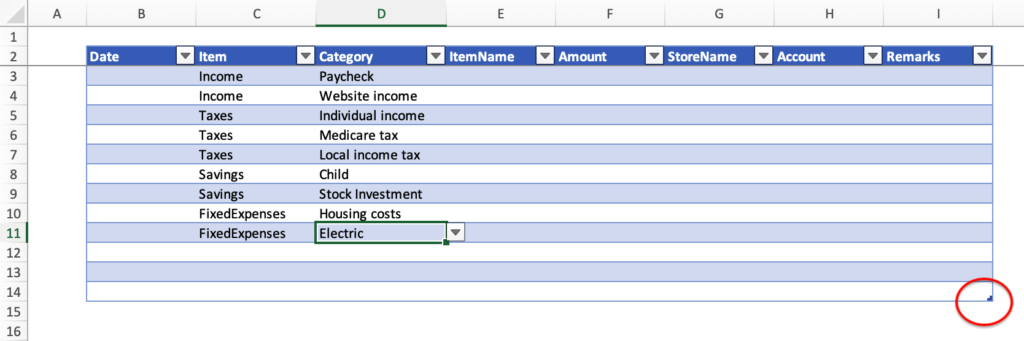
Create Table
Select the heading and choose “Insert” “Table”.
Check the “My table has headers” checkbox.
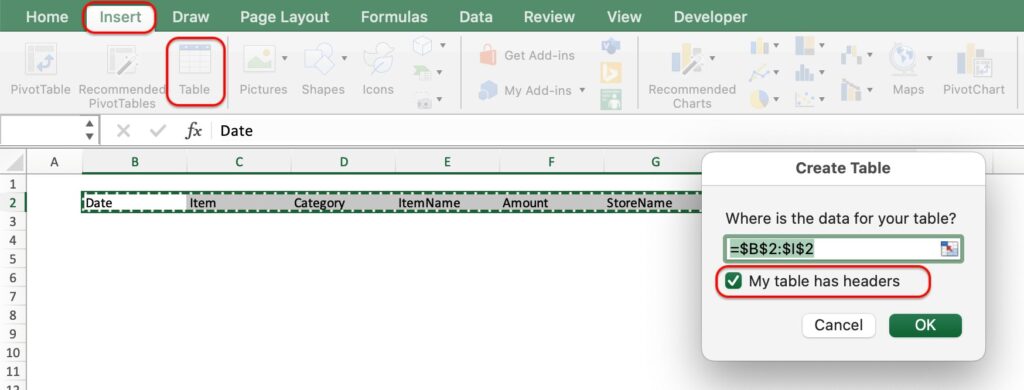
Table has been created.

Date Setup
Set the date display format.
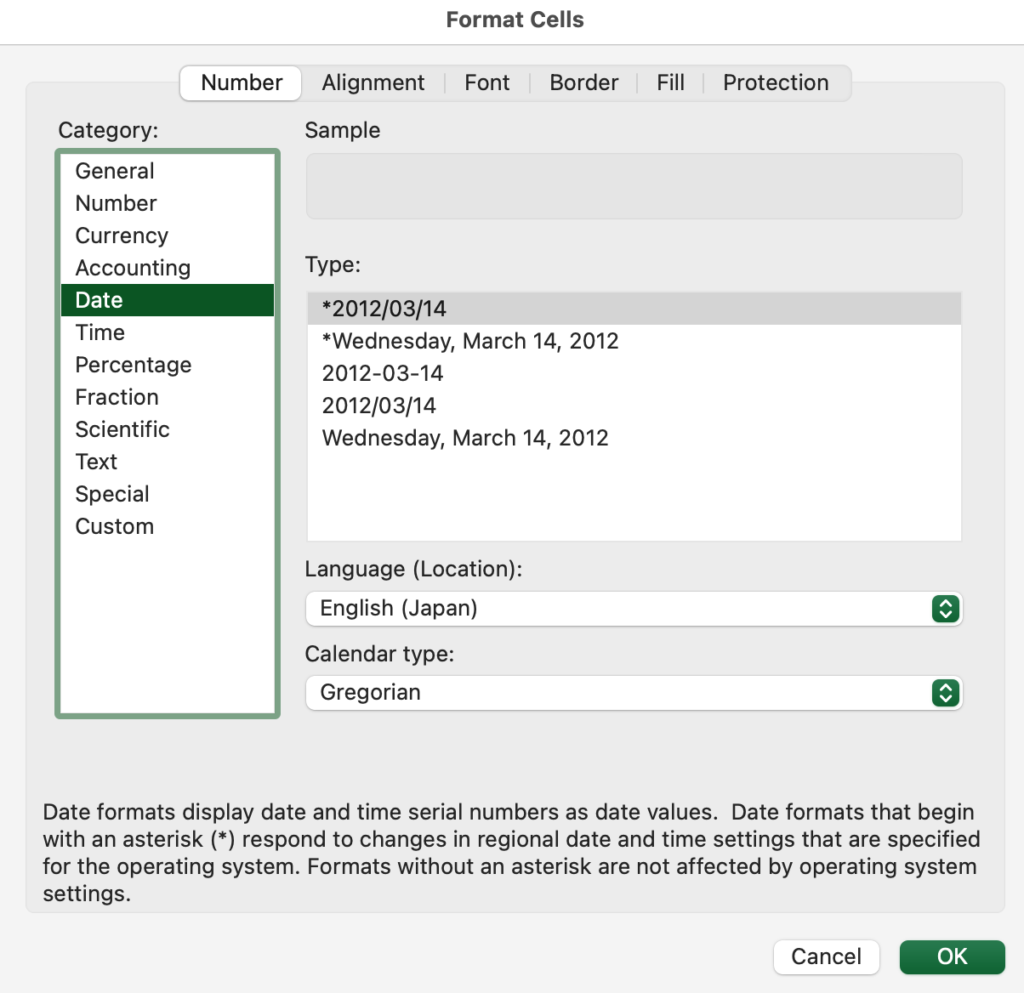
Right-click on cell B3 and select “Format Cells”.
Select Number, Date, Type as “Year/Month/Day” format.
Set Item
Set tabs to allow selection from Income, Taxes, Savings, Fixed Expenses, and Variable Expenses.
Select cell C3 and click on “Input Regulations” for the data.
For Allow, select “List” from the tab.
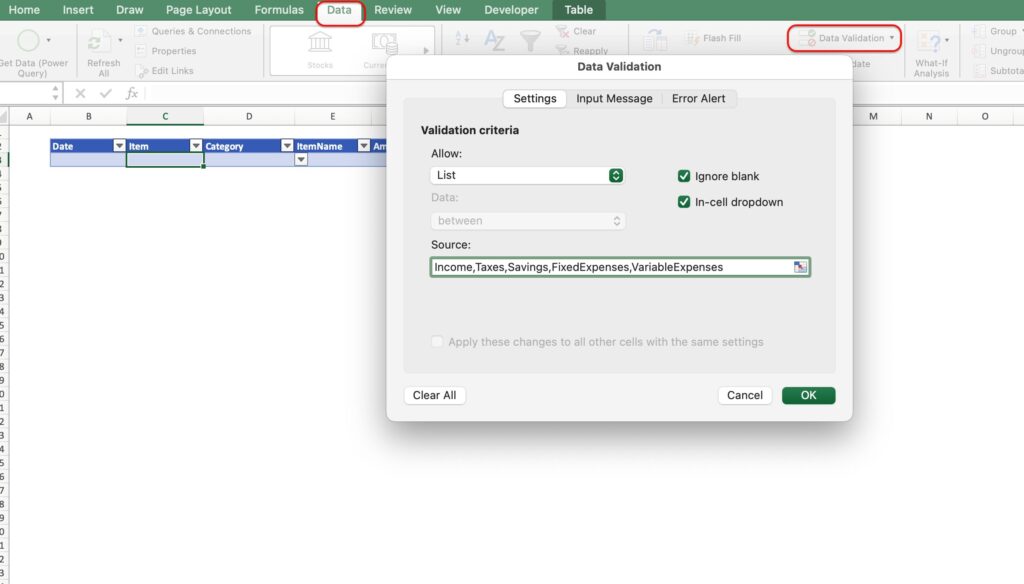
In "the original value"Source, enter “Income, Taxes, Savings, FixedExpenses, VariableExpenses”.
Tabs are now set up to allow selection of item names.

The item name must match the name on the configuration sheet.
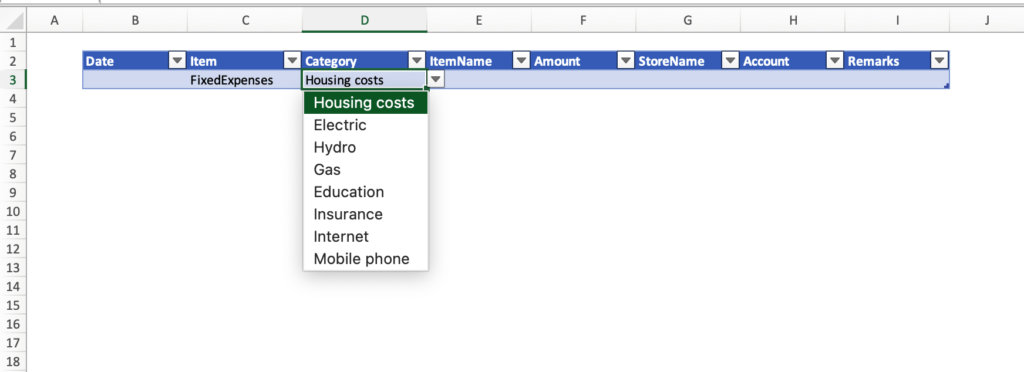
Setting up Expenses
Expense item names are listed using the INDIRECT function.
The INDIRECT function is a function that allows you to specify cell references as strings.
By using the INDIRECT function, the expense names are listed for the item name selected in the item.
Click on cell D3 and click on the "data validation".
Enter “list” for the "Allow "and “=INDIRECT(C3)” for Source.

If the item name is a fixed cost, the fixed cost expense name will be displayed in the expense line item.
If the item is not named on the setup sheet, it will not be displayed.
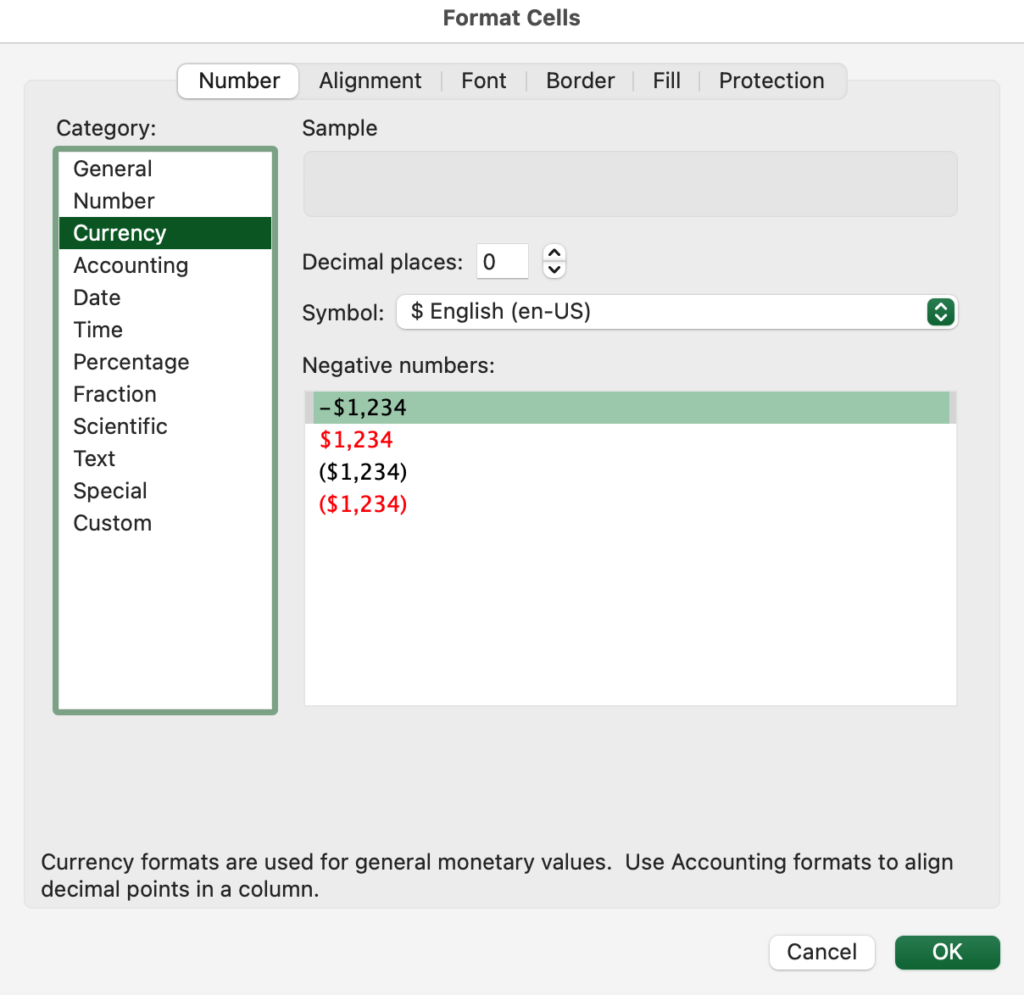
Adding currency units to amount columns
Right-click on the amount cell F3 and select “Format Cells”.
Click the Number, Currency, select your local currency unit.
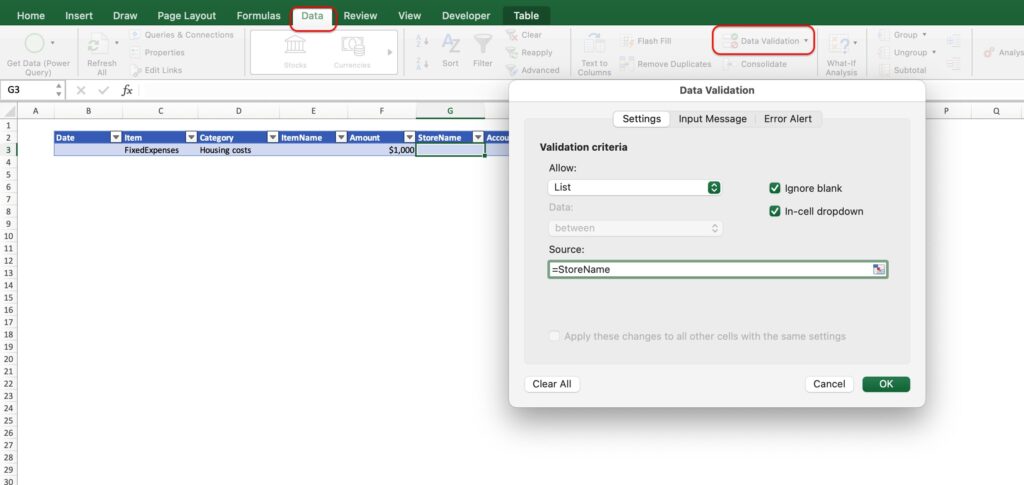
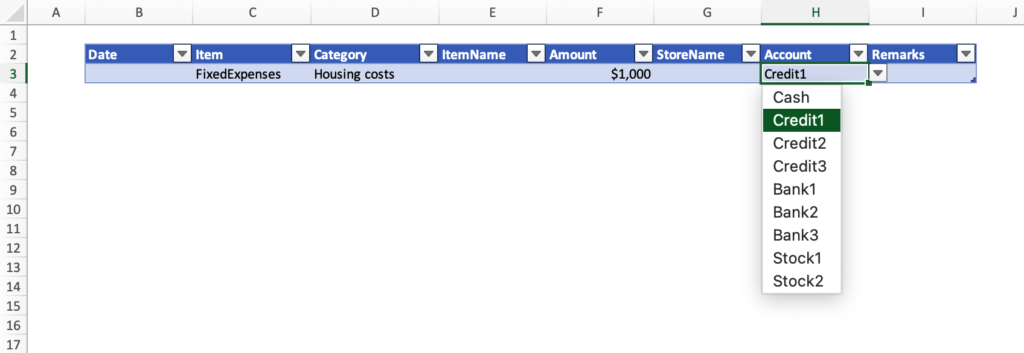
Set tabs for store name and account
Set tabs for the store name and account cells.
Select cell G3 and click on Data Validation.
For Allow, select list, for Source, enter "=StoreName".
In the Account cell, enter “=Account”.
Enter the name you named in the settings sheet.
The information entered on the setup sheet will be reflected.
Fix heading rows
Fixing the second line and moving only the subsequent lines makes daily input easier.
Select the third row, view, and click “Freeze Panes.
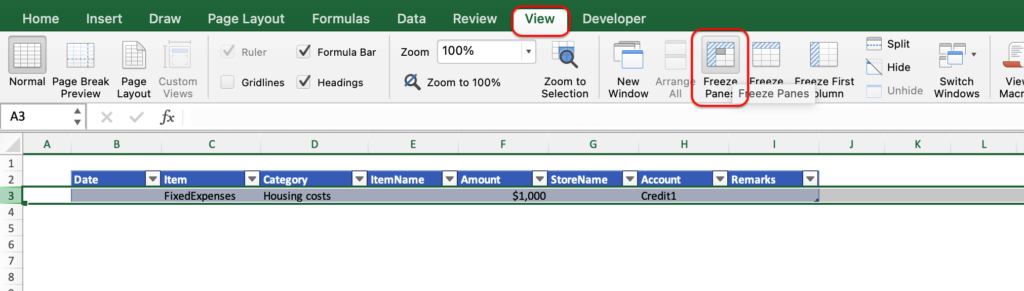
When scrolling down, the heading line is fixed and only subsequent lines are movable.
Select a design
Select the design of your choice from “Table.”
Enter sample values
Enter sample values to create the Income and Expenses sheet.
Enter sample values after creating the Fixed Expenses sheet.
Enter the date as month/day, e.g. “10/5”.
Enter expense items with a minus sign.
(To display income/expenses (income - expenses) on the income/expenses sheet)
Fixed Cost Sheet
To make inputting as easy as possible, a fixed cost sheet is provided.
By entering all items other than variable expenses in this field, you can copy and paste the ranges from the fixed cost sheet into the input sheet each month.
Copy input sheet
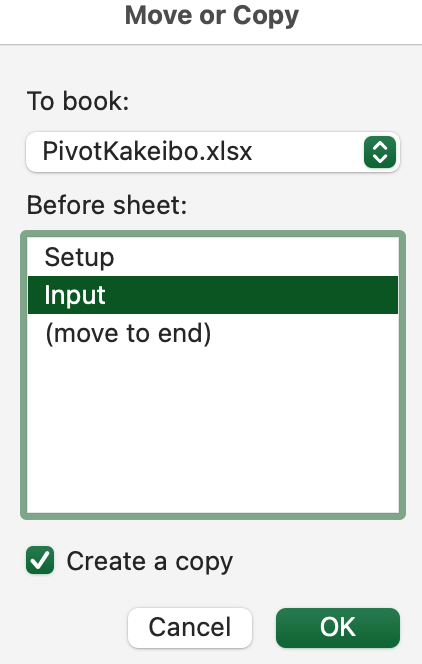
Right-click on the sheet name to copy the sheet.
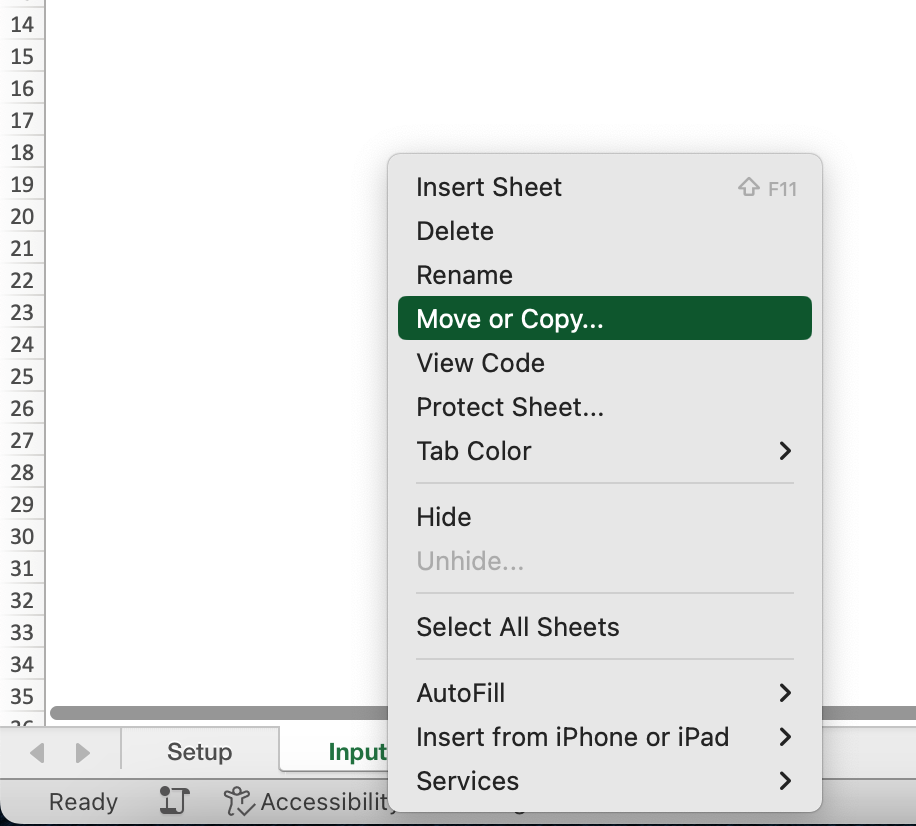
Once you have made a copy, change the sheet name.
Enter Sample Values
Enter the items that will be required each month except for variable expenses.Leave the date blank.
Enter expense items with a minus sign
To show income/expenses (income minus expenses) in the income/expenses table.
Drag the bottom right table edge down to expand the table.
Paste to input sheet
Paste the range from the fixed cost sheet into the input sheet at the time of the month change.
Copy the range after the heading.
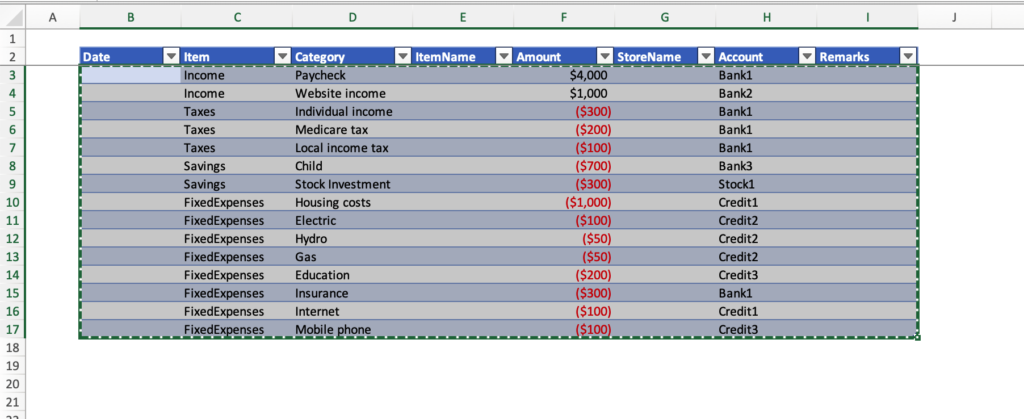
Paste to the line following the last line of input on the input sheet.
Right click and paste only the values.
If you paste everything, the tabs for expenses will disappear.
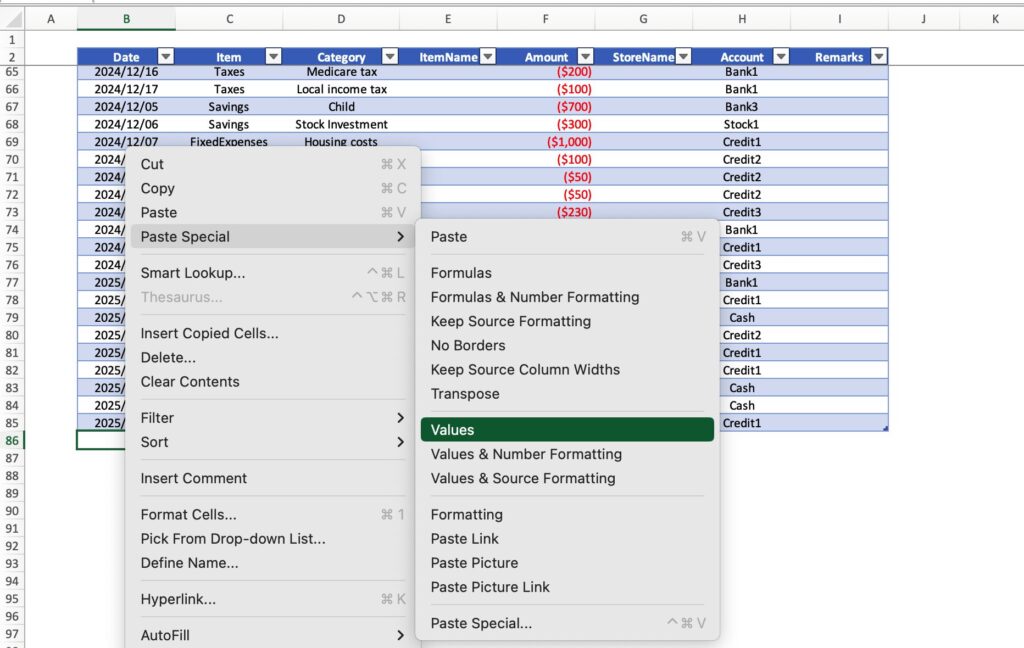
After pasting on the input sheet, enter the date and correct the amount if necessary.
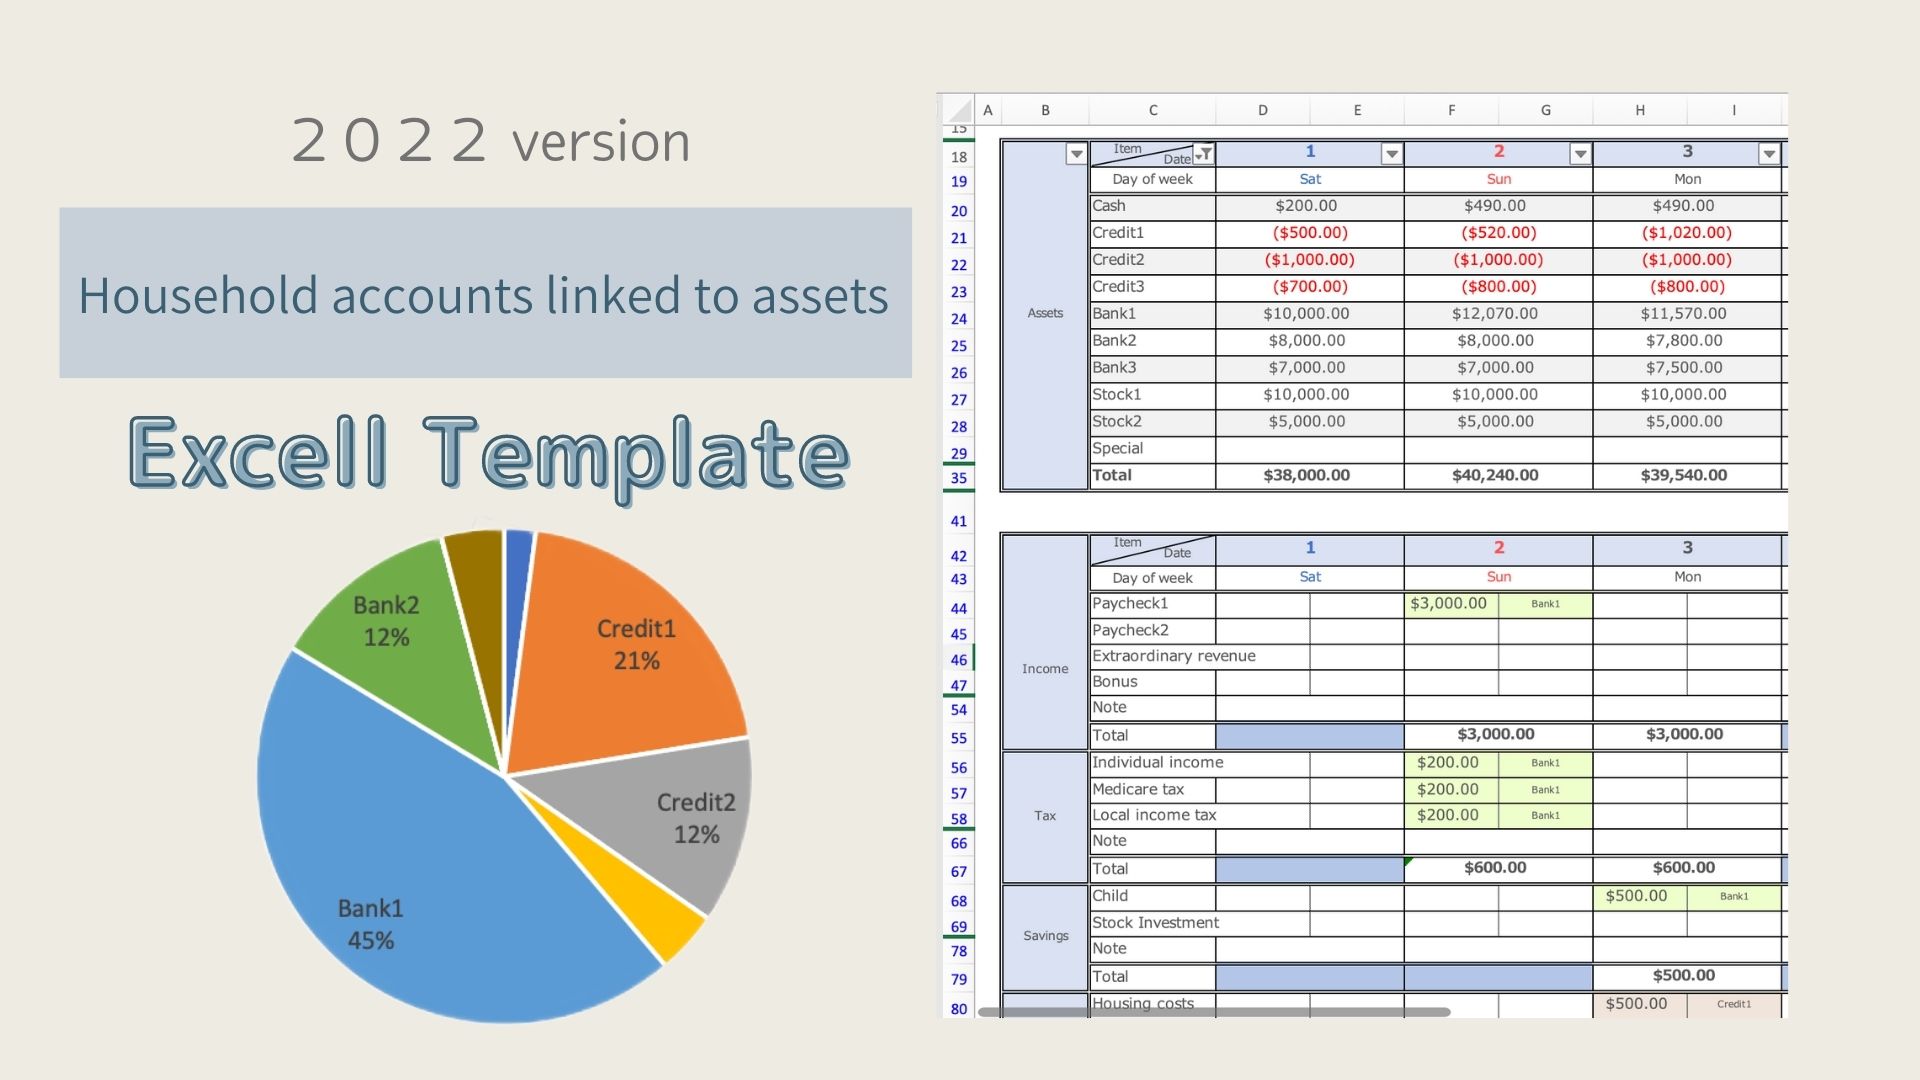
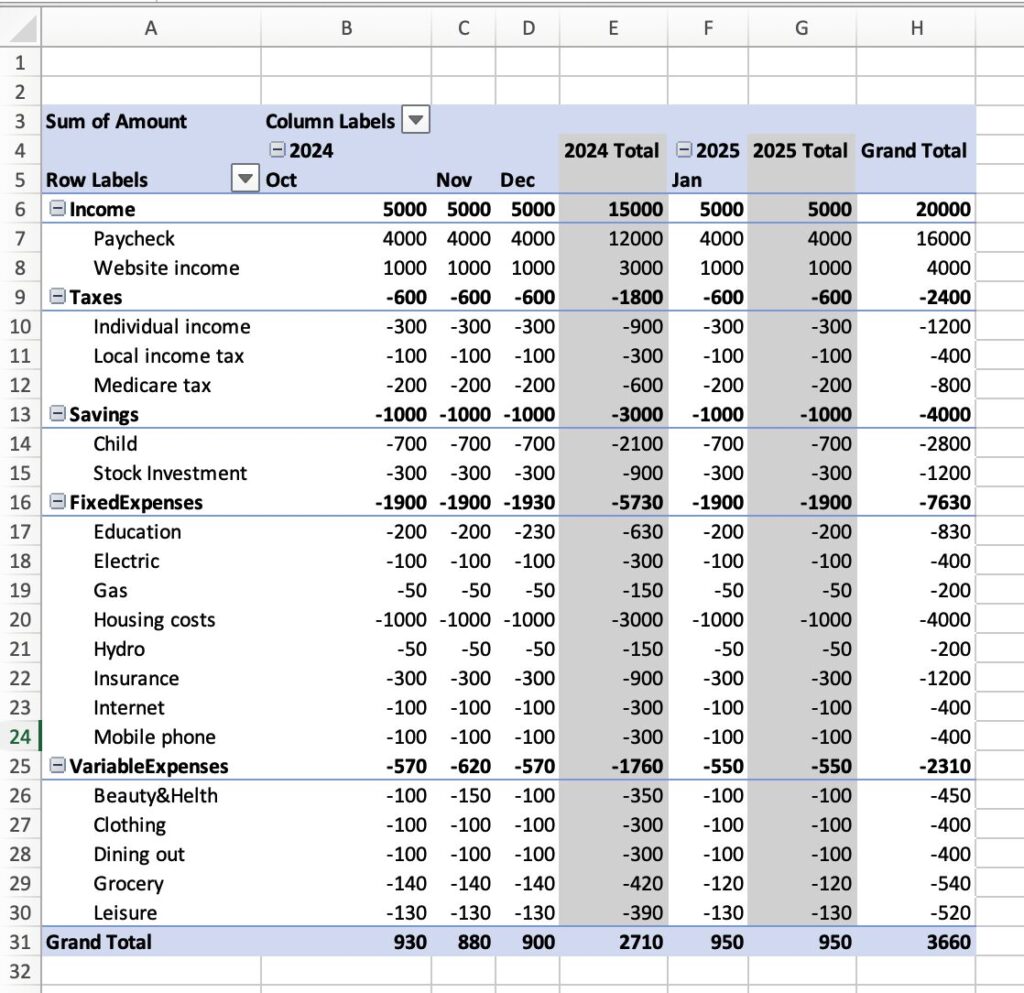
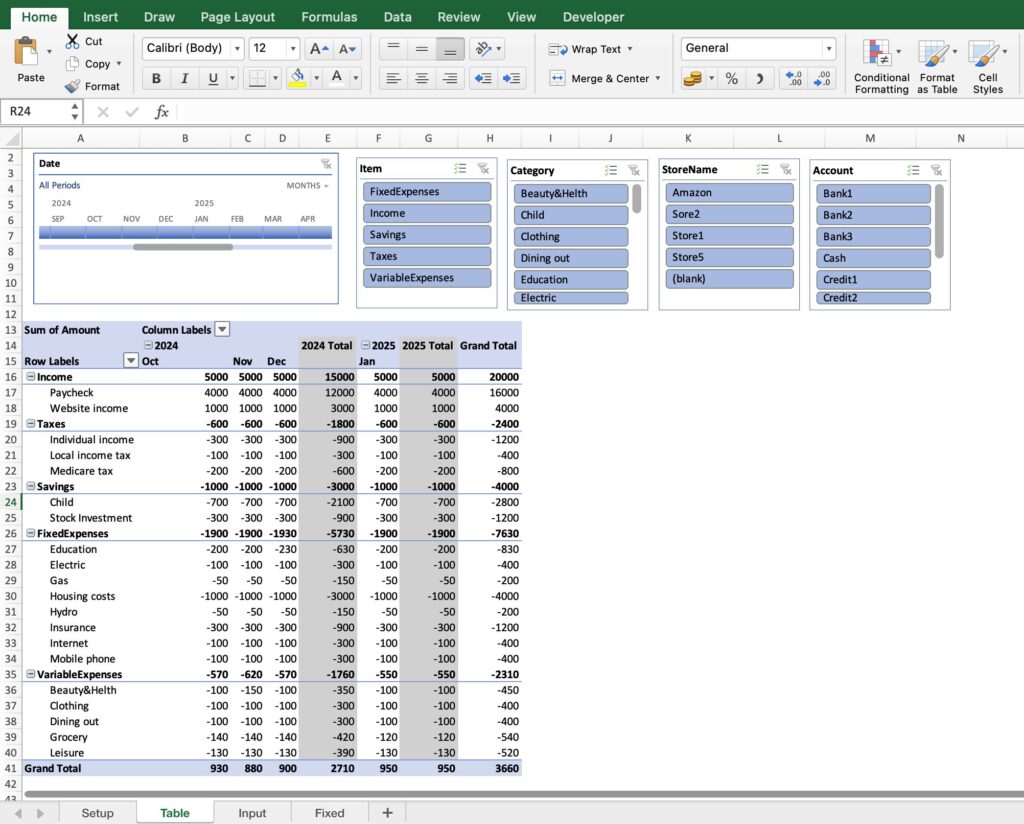
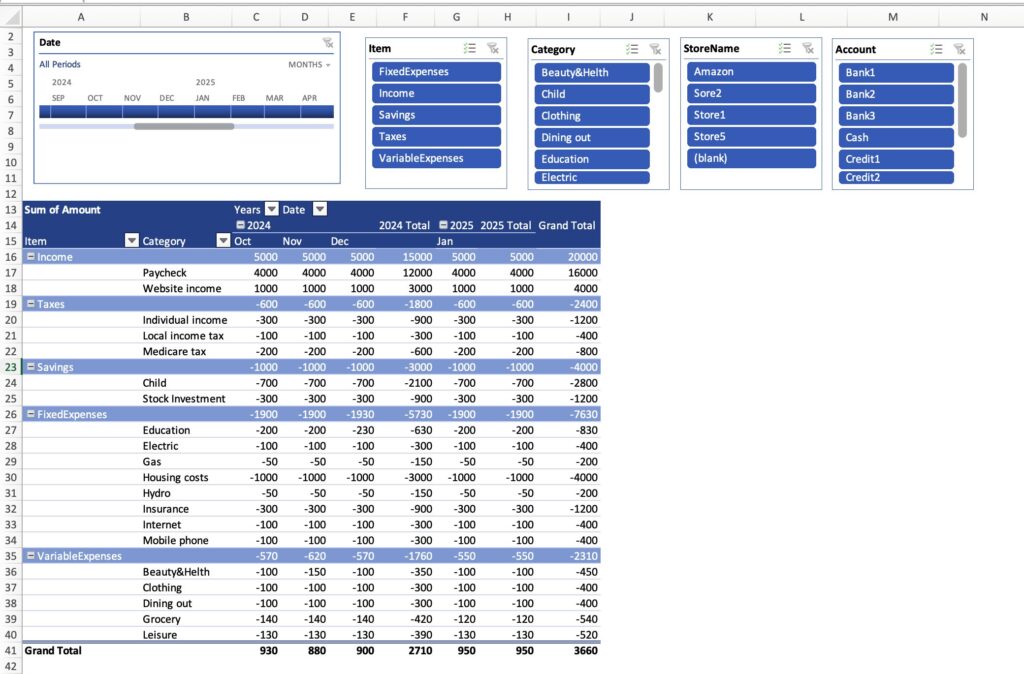
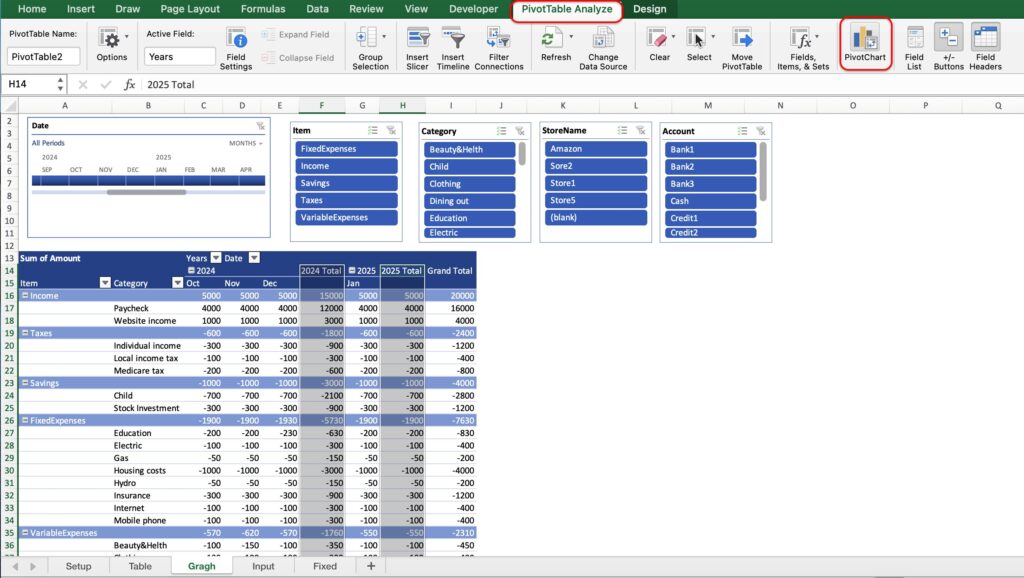
Table sheet
Create tables by month and by expense category based on the information entered on the input sheet.
Create Pivot Table
Select the input range of the input sheet (including headings) and click on “Pivot Table” under Insert.
Check “New Worksheet” for the destination of the pivot table.
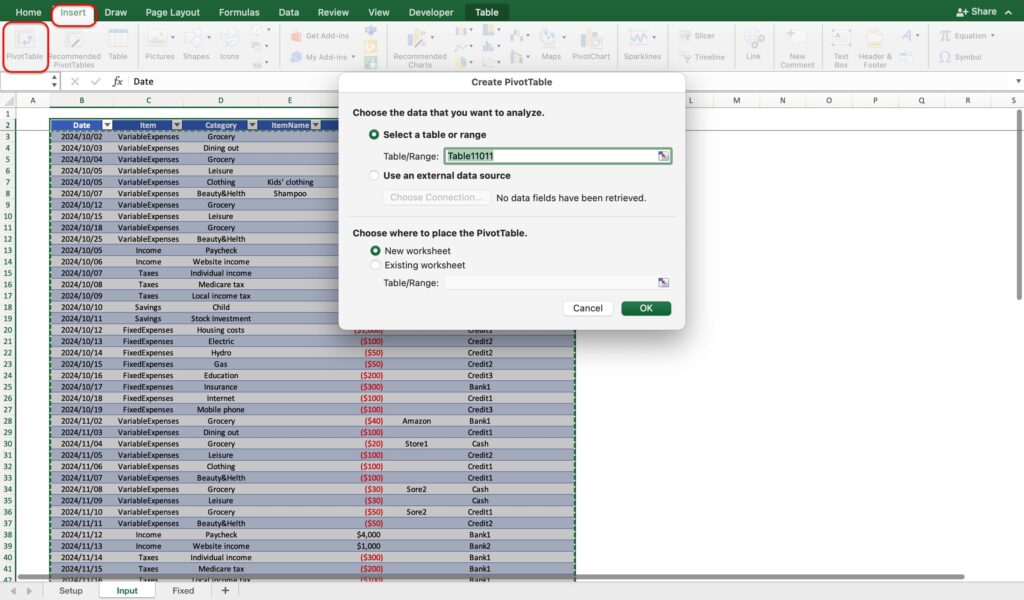
A new sheet will appear with the pivot table fields.
Change the name of the sheet to something easy to understand, such as “Table" .
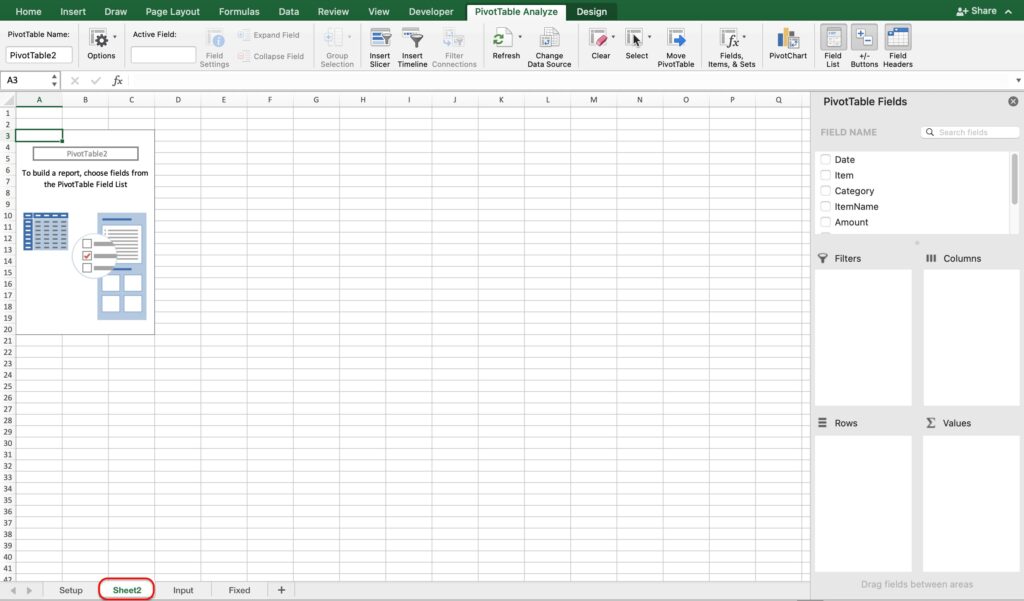
In the Pivot Table fields shown to the right, select the columns, rows, and values for the table.
- Column: Date
- Row: Item, Category
- Value: Amount
Select the field name and drag it into the "Columns", "Rows", and "Values".
Dates are grouped by Years, and Quarters.
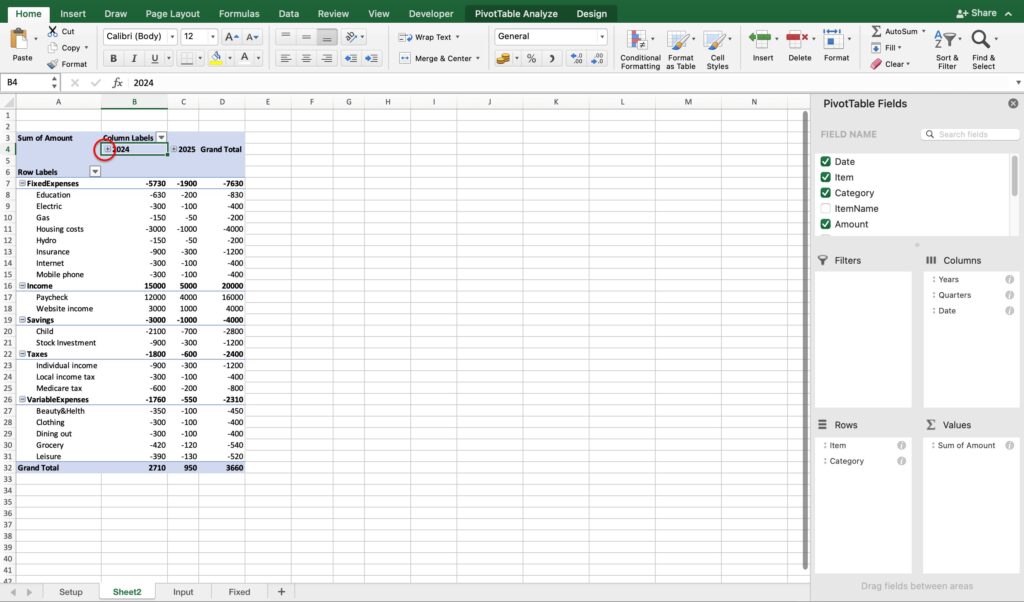
A table has been created.
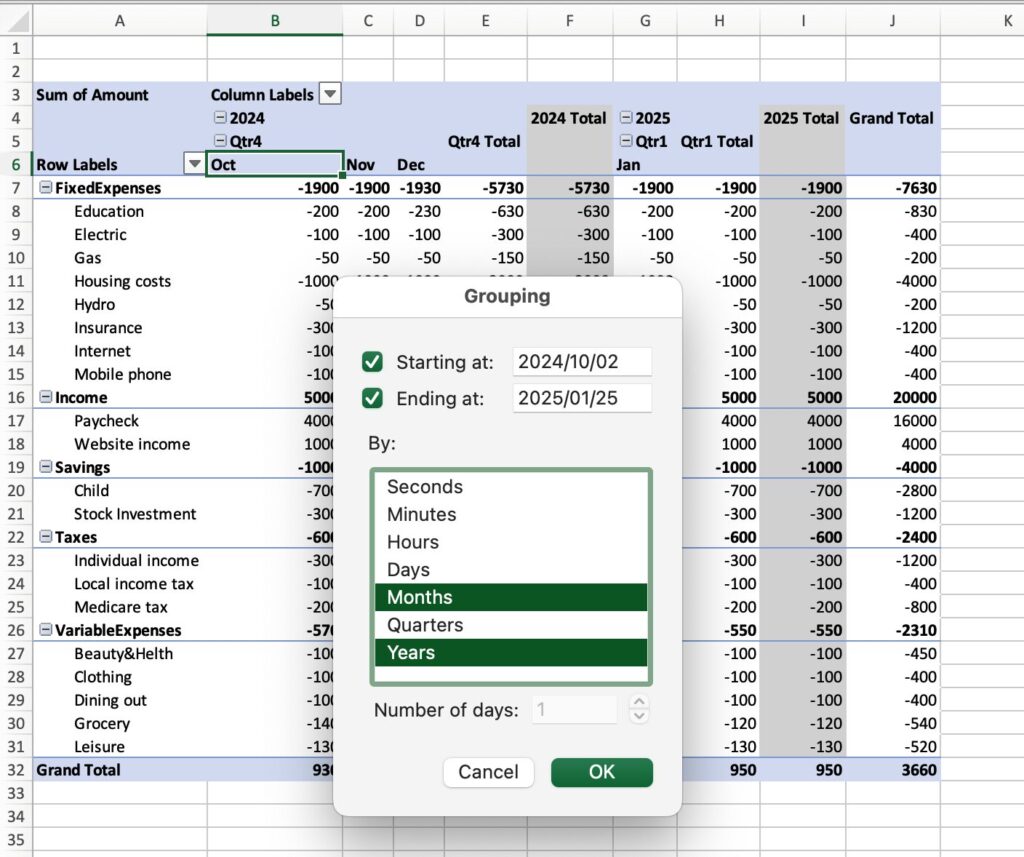
We want to display the year and month, so we group the month entries.
Right-click on any month and select “Grouping”.
Select “Year” and “Month” and click “OK.
Click on the minus to the left of 2024, click on Qtr4 to see the month.
Reorder items.
Click on the item you want to reorder and move it up or down.
(You can move it up or down when the hand symbol appears.)
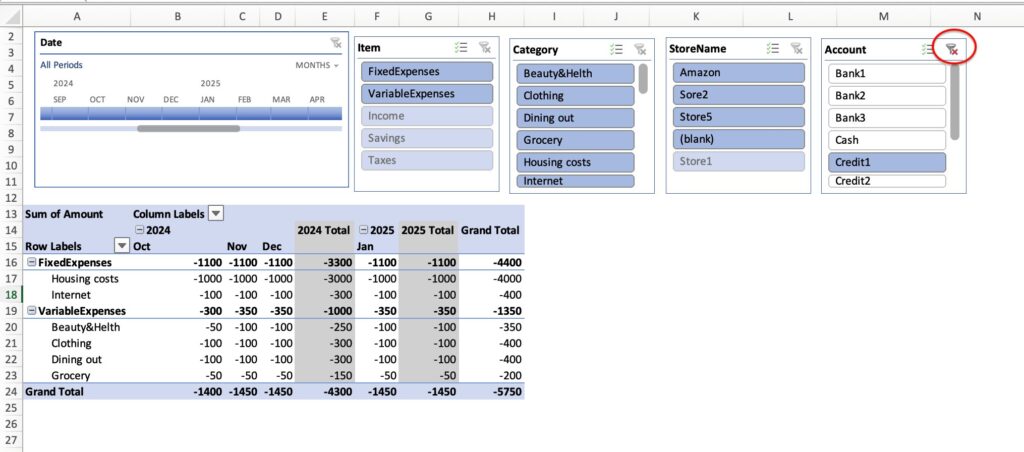
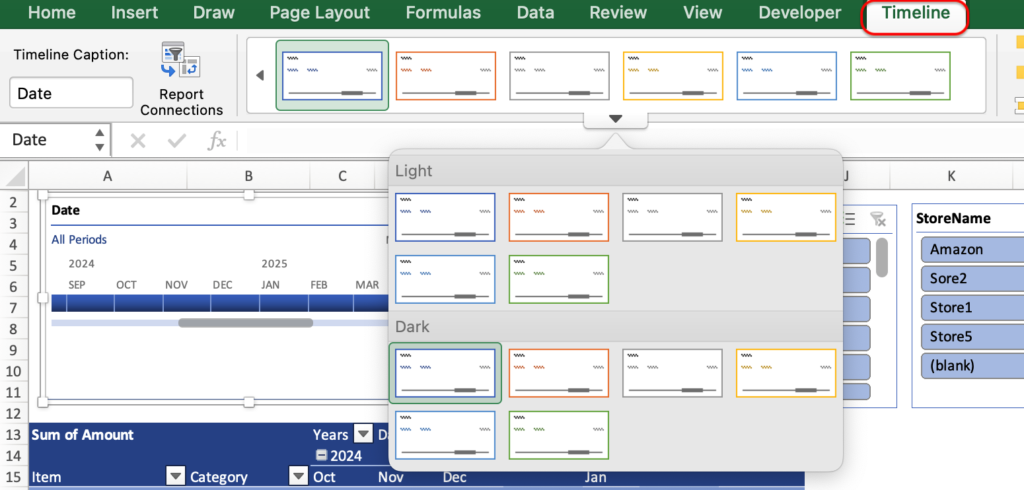
Creating a Timeline
Add a timeline to display only a specific month or year.
Insert about 10 rows above the table.
Click on “Insert Timeline” in Pivot Table Analyze.
Check "the dates"Date" and click “OK.
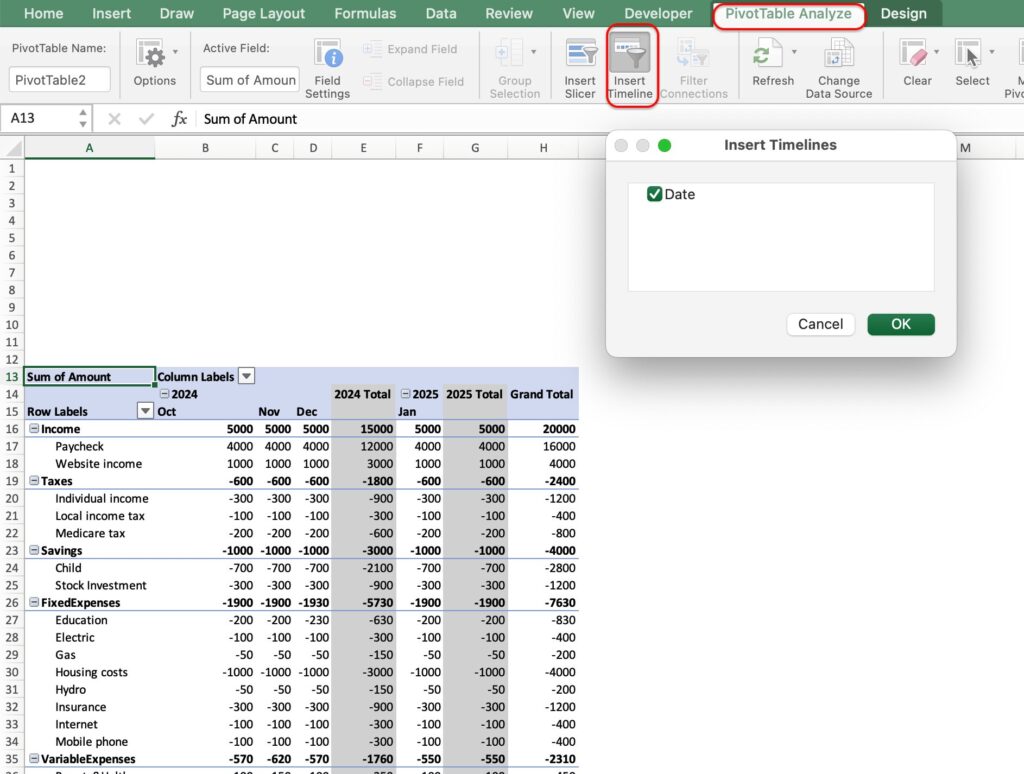
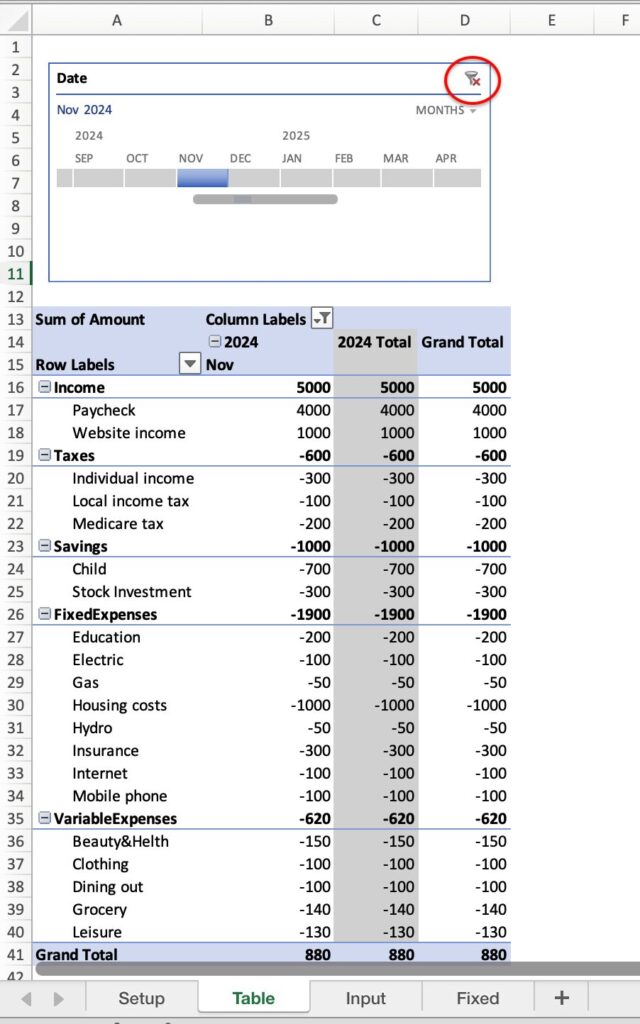
The timeline is now displayed.
You can view only a specific month or year.
To undo, click the X in the upper right corner.
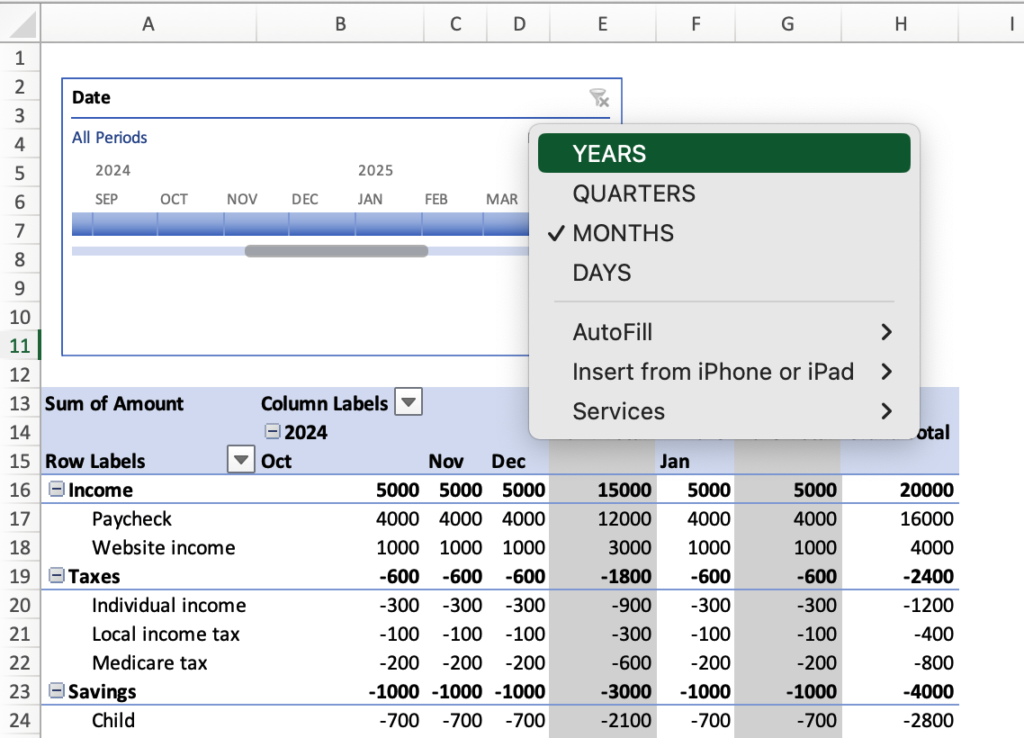
Click on the month view to change it to “YEARES” or “QUARTERS".
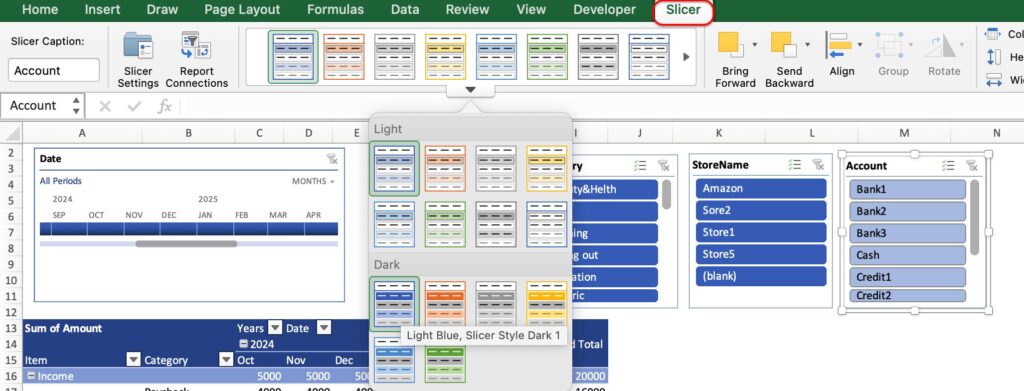
Creating a Slicer
To display only specific items, display the slicer.
Click on “Insert Slicer” in the Pivot Table Analyze.
Check the items you want to display.
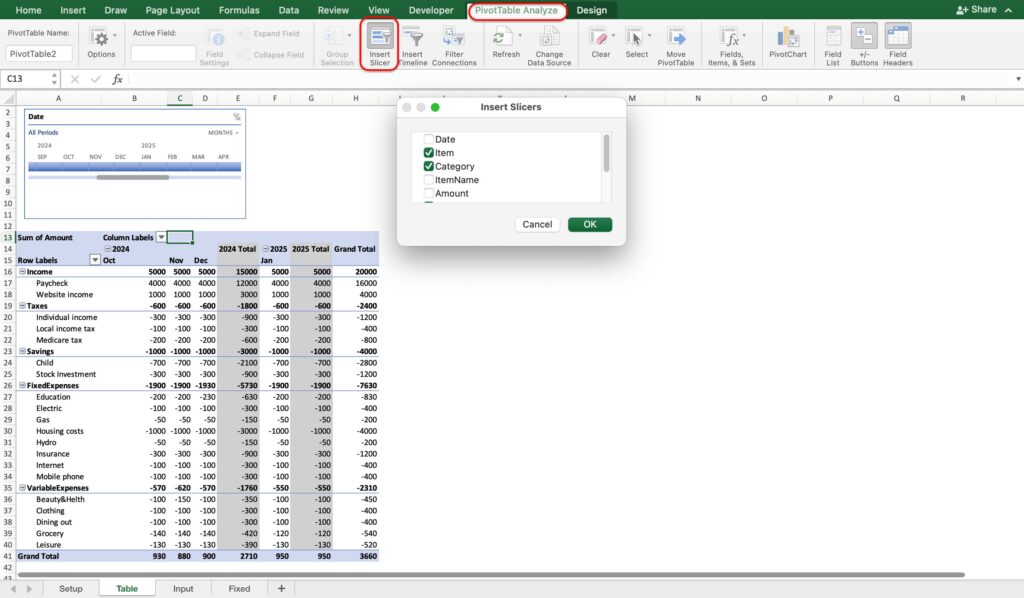
The slicer for the checked item will be displayed.
For example, if you want to view the consumption amount for “Credit1”, click on “Credit1” in the account.
Only the consumption amount for “Credit1” will be displayed.
To undo the change, click on the cross in the upper right corner of the slicer.
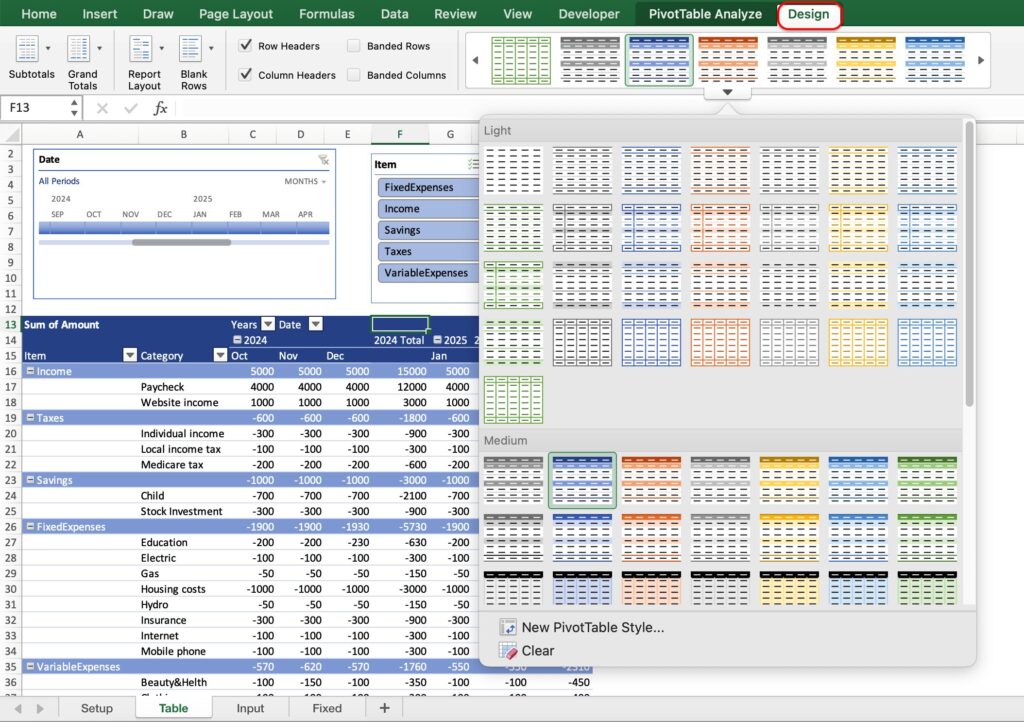
Design Selection
Pivot Table Design
Select “Report Layout” under Design.
- Compact form: Display items and expenses in one column
- Outline form: Display items and expenses in two columns
- Table form
You can choose from three types of formats.
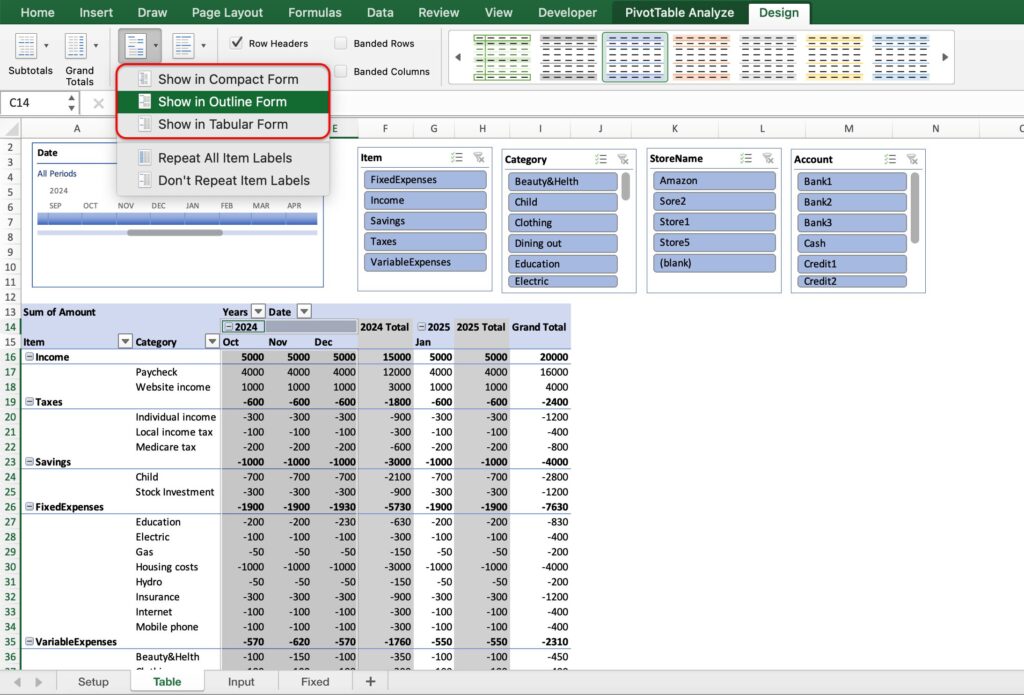
Please select your favorite design from the Design.
Timeline Design
Select your preferred design from the Timeline.
Slicer Designs
Select your favorite design from the Slicer.
Once the design has been changed, the table sheet is complete.
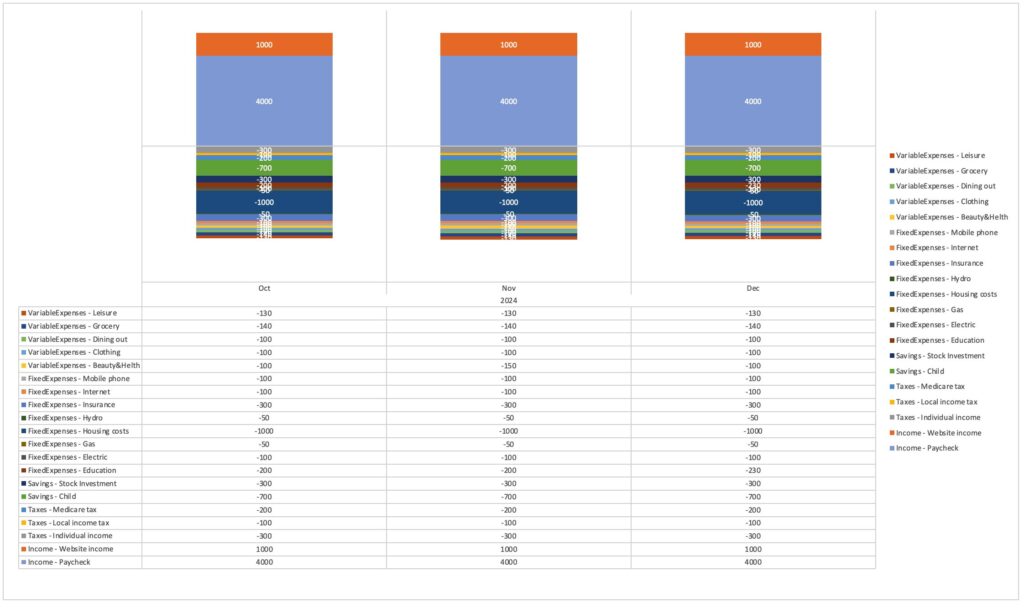
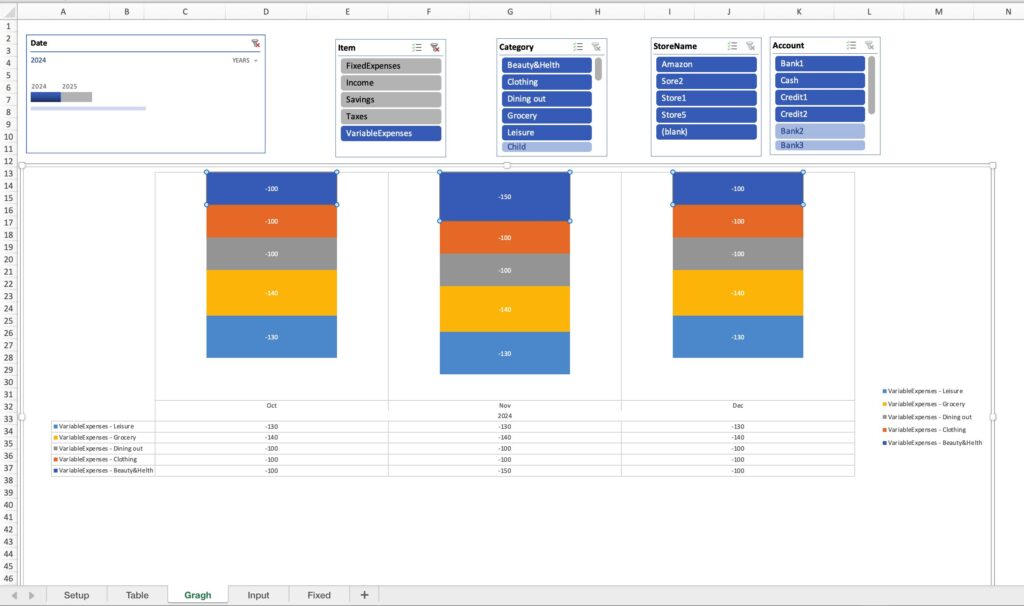
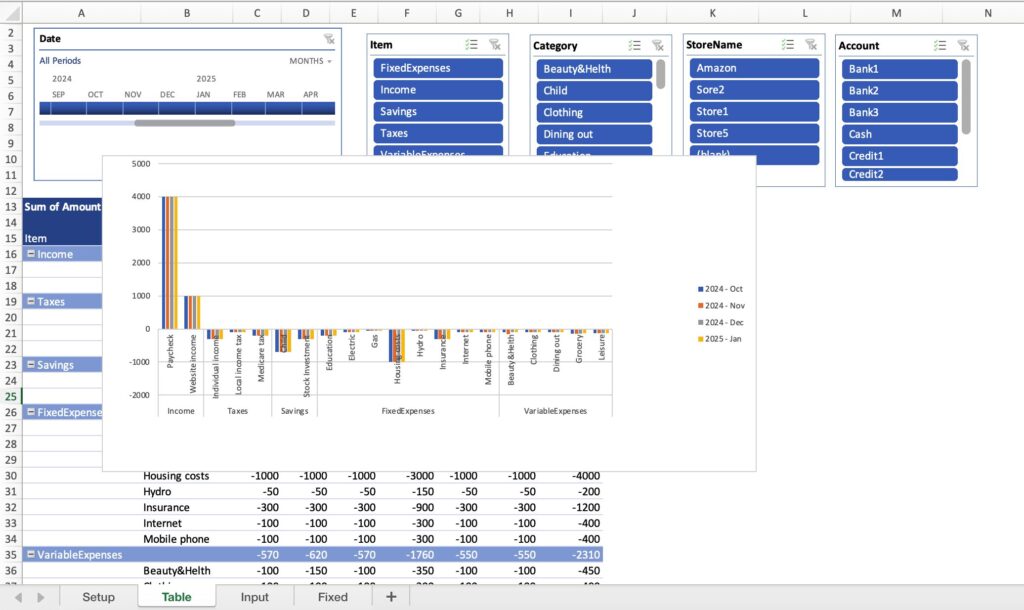
Graph Sheet
Create a graph based on the table.
If you create a graph based on the table in the table sheet, a graph by expense category will be created.
We want to create a graph by month, so we create a new graph sheet.
Copy Sheet
Copy a sheet from the table sheet.
See “Copying a sheet” in the Fixed Expenses sheet.
Alternatively, you can copy a sheet by holding down the Ctrl button and moving the table sheet to the right.
(Mac: “option” button)
Rename the copied sheet.
Create Graph
Click on a portion of the pivot table on the graph sheet.
Select “Pivot Chart” in PivotTable Analyze.
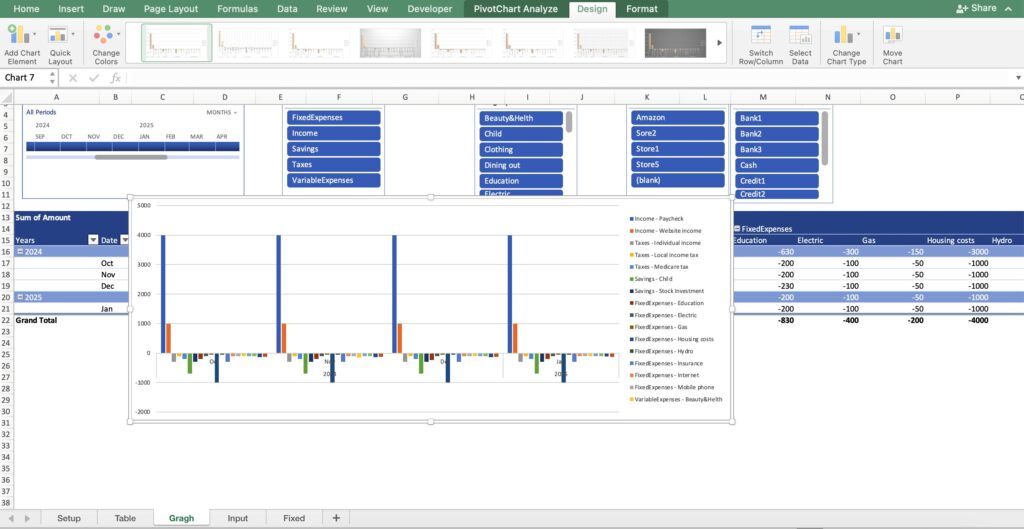
Click on a portion of the pivot table and select “Switch Row/Column” in Design.
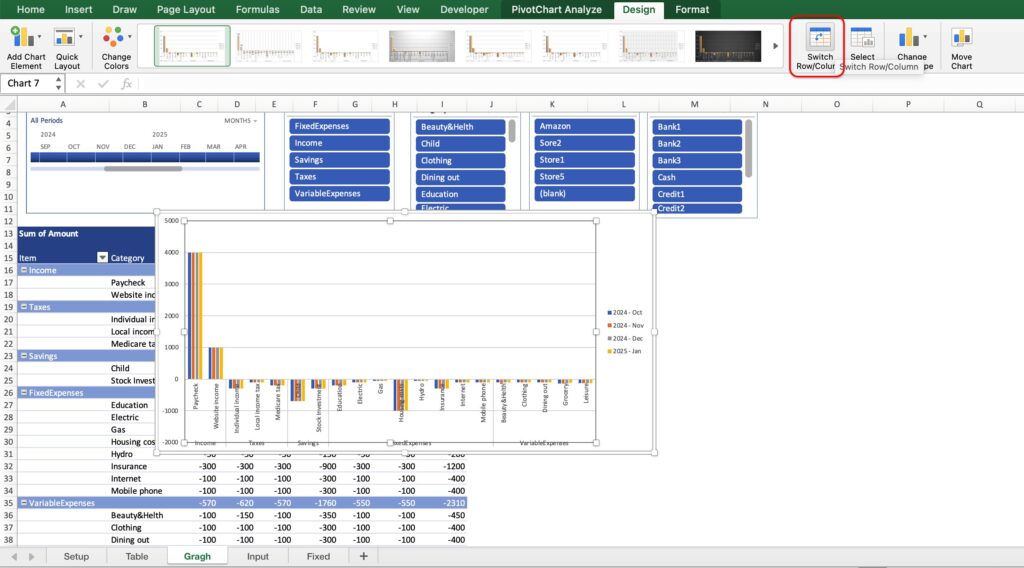
Graphs are displayed by month.
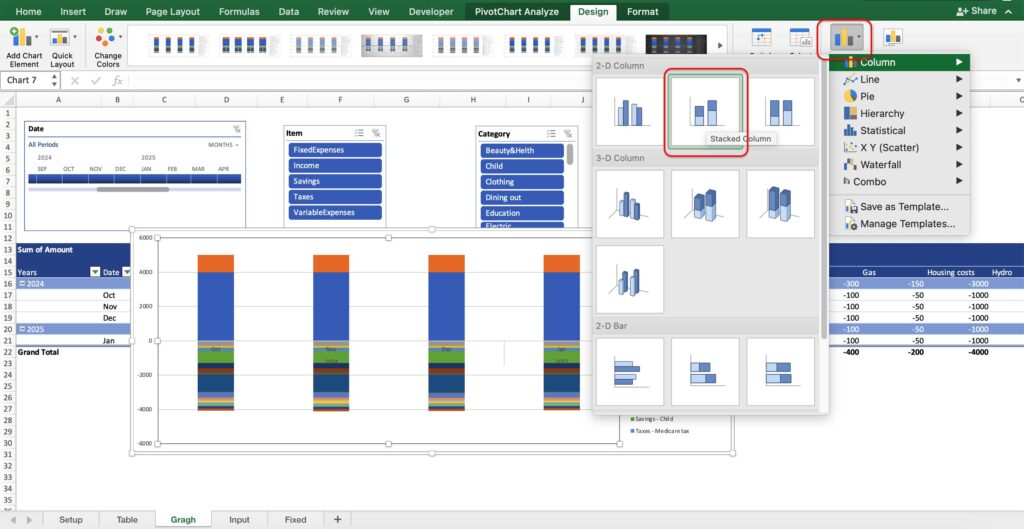
Change the bar graph to a stacked bar graph.
Select Column, Accumulating Bar from Change Chart Type.
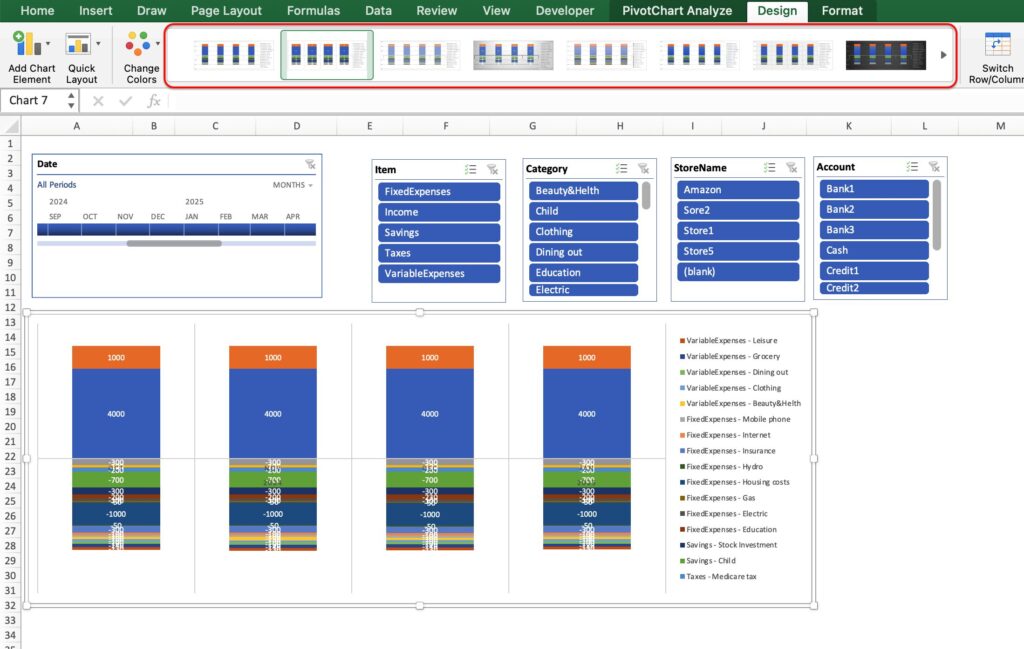
To display the graph above the table, insert a row above the table and position it so that the graph is above the table.
Select Design
Click on “Design” and select the design of the graph.
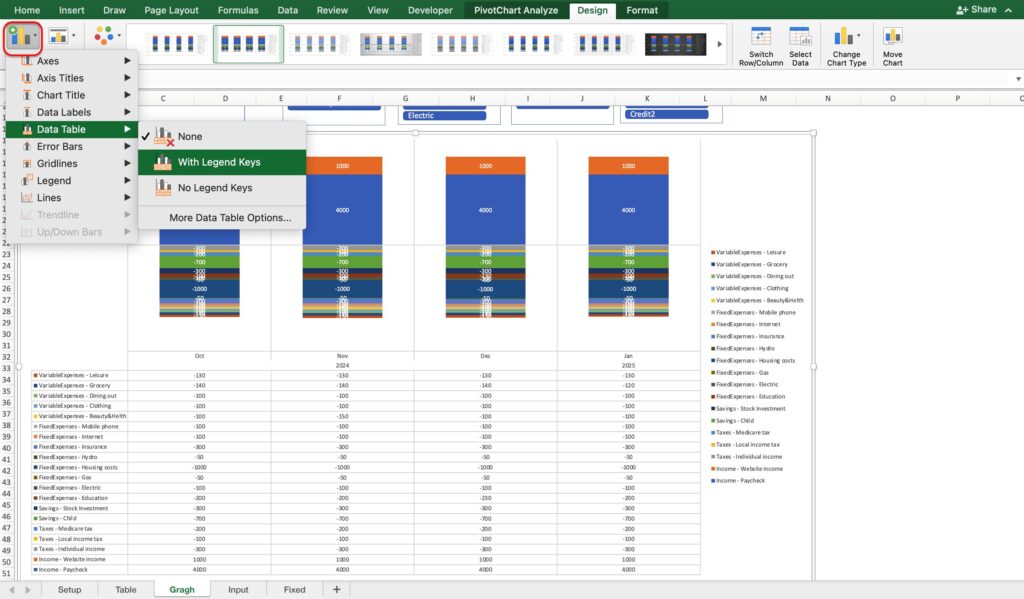
Add Data Table
Select “Add Graph Element” under Design.
Click on “with legend markers” in the data table.
A data table appears below the graph.
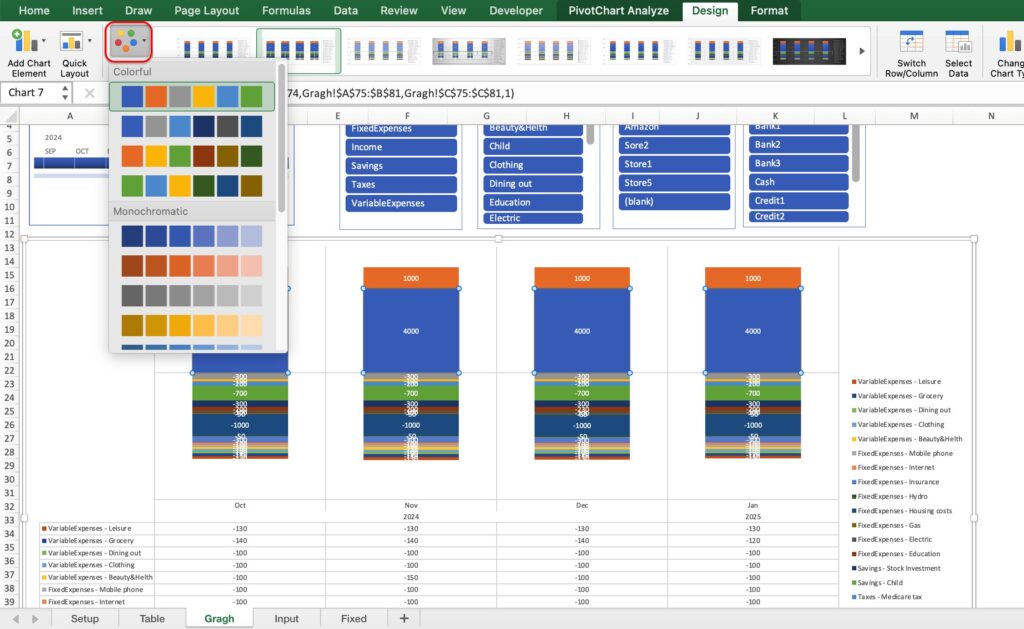
Select Graph Color
Select the graph color from “Change Color” in Design.
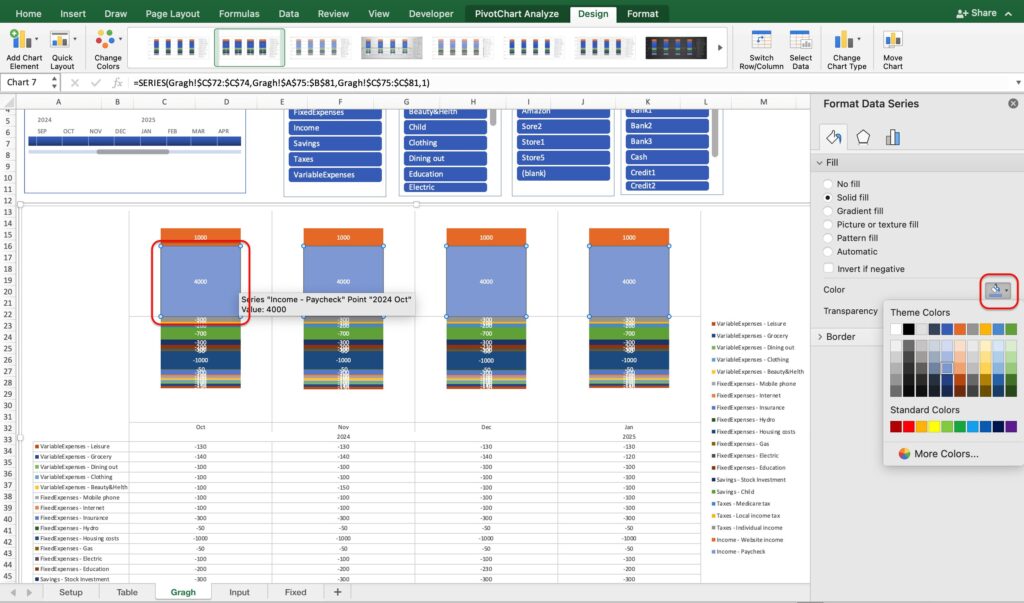
To set the color by expense item, right-click on the bar chart and select “Format Data Series”.
Change the fill color.
Select specific time period and items
Select a time period on the timeline.
You can use the slicer to display only specific items.
Download Samples
The file is downloaded in Zip format.
Please unzip it before use.
Two templates are included: a sample template and the original template.